


Hello, Karen here with a tutorial about making your text follow a shape. As I use this technique quite a lot it I am asked how I achieve it more than any other question.
You will need:
Silhouette Cameo
Silhouette Pens
White and coloured card/paper
STEP 1 - making your text follow a shape.
- I started by drawing a 3 inch circle and use the to change the line from 'cut' to 'no cut'. I used a sketch font, which are designed specifically to be used with the Silhouette pens to write my text below the circle. I chose 18pt and wrote it seven times with a 'space dot space' between the words.
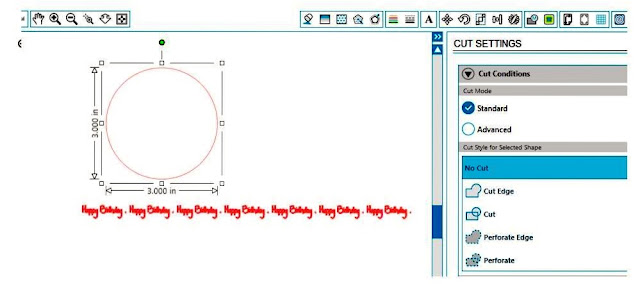
- Once you have written your text, when you click on it you will notice that it has a green box around it and a circle with a cross on the left side.

- If you use the circle with a cross to drag the text to the circle it will snap around the circle. You can also use the circle with a cross to drag the text around the circle until it is in the position you would like.

STEP 2 - Writing around your shape.
- For your final step you need to change your ratchet blade to Sketch Pen in the cut settings and to take your ratchet blade out of the Silhouette and replace it with a Sketch Pen. If you don't have a set of Sketch Pens you could use a Silhouette Pen Holder and a pen of your choice. I used writing around various shapes all the time and love the results it gives. As you can see from the card and layout, below, you can get great results from a quick and easy technique.


DESIGNS USED:
 |

|
 |
 |
|


No comments:
Post a Comment