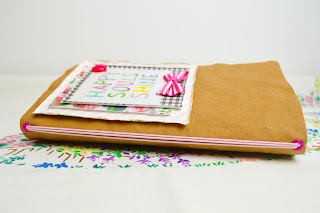
My name is Caroline Free and I am an notebookaholic. Here is a simple, but useful tutorial to make a special, personalised notebook in two sizes
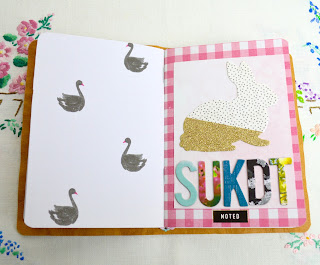
This is what we will be making!
I always have three notebooks on hand on my desk, one for my blog, one for ideas and drawing layouts in and one for here, the Silhouette UK Design team. I am always jotting down what I am doing, planning to do and have done.
Here is one of my books of scribbles! These are my notes for this blog post - yikes!
What you will need:
- faux leather
- plain copy paper
- patterned paper
- embellishments
- elastic
- cropodile (although could use a strong hole punch or a paper piercer)
- Kraft knife/stanley knife (optional)
- Metal ruler (optional)
- Bone folder (optional)
- Long arm stapler or some embroidery floss/thread and needle
- Book clips
How to make it:
The silhouette part of this is super simple but I love how you can make exact measurements with it and when cutting these they need to be just right!
I didn't use any particular design for this I just drew an oblong shape in two different sizes as I was making two different size books. The reason for this is that one is larger and can sit on my desk with fun dimensional embellishments on, the other is smaller and just stitched on the front so that I can pop it in my handbag and make notes on the go.
Let's start with the covers...
Large book cover - the size of this is 9 1/2" x 8 1/4'
Small book cover - the size of this is 8' 5 1/2'
Here are the cut settings I used...
You can make your note book any size you want, this is just the size that I felt would suit me. If you choose to make yours a different size you will need to remember to change all the internal dimensions for the book inserts.
Ok so once you have cut your covers you now need to soak them in warm water with a little washing up liquid in it.
Then give them a good old scrunch up, I like mine really textured. Then rinse them off, lay them flat and let them dry - I am very impatient so I used a heat gun on mine to speed it up. It does take a while but it's so worth it!
Now for the insides...
This is the large book first.
I knew that I wanted to insert three booklets inside each of mine so I prepared three patterned papers.
The dimensions of these are 8" x 8", smaller than the cover as I wanted a spare bit of edge. You will see I have 2 of each pattern, you don't need to do this, I just wanted to make two books of this size so you only need one of each design. The dimensions for the smaller book inserts are 7" x 5".
Next fold each paper in half so the pattern remains the right way up.
Inside each of these I took 10 sheets of copy paper and cut them to the same size as the patterned paper 8" x 8".
Again, fold all these in half too.
Then stack them inside each other and place the cover around it so it starts to look like a book.
You will see below that once you have stacked the papers inside each other the innermost papers start to be pushed out slightly creating a spare bit on the edge. It's fine like this and if it doesn't bother you just leave it! But if you are a stickler for detail then you will need to do the next step.
Soooo to trim the edge of the papers so that they all line up perfectly you will need to use a sharp craft knife or like me use a stanley knife.
Line up your ruler on the edge of the patterned paper and use your knife to do repeated slow medium pressure cuts, small pieces of free edge will keep coming away until you have a beautifully lined up straight edge. YAY!
Now again you can leave the edges like this or you can make them rounded using a corner punch. If you are doing this it's essential that you keep the pages in the right order or you will affect the edge of the book that you have just trimmed. In my large book I left them square, in my smaller book I rounded them! I did round the edges of both covers.
So we have almost done, we just need to attach the pages together. On my larger book I used embroidery floss, making a hole 2 inches from the top and the bottom and then threading the pages, tying them off in the middle of the book...
For the smaller book I used a long arm stapler. I found it easier to open the pages out and put a book clip on either side, this stopped it moving about too much whilst I stapled them.
Set the inside books on one side and go back to your cover. Now you need to create two holes on the very top edge of yout covers and the very bottom edge. You will see that I have used an eyelet on mine but this really isn't necessary I just wanted to. The faux leather is sooooooo strong it won't tear! I've tried HA!
Then you need three sets of elastic that you tie off in the middle. You will see that I began with a thick blue elastic but later I change to a thinner pink one. I found this a little bulky! Don't make them too taught or you will find the book pulls, let them have a little give in them.
To decorate the fronts on the larger one I used papers and dimensional embellishments as this will sit on my desk.
For the smaller one I knew that it needed to be flat and a smooth finish as it's for my handbag and I didn't want it catching on anything as I pull it in and out. So I just took a simple heart shape that I had lying around, a paper piercer and made holes all around the shape, then sewed it in three different pinks in an ombre effect.
To add the books into the cover you simply slide it under one of the pieces of elastic and it holds in place. For me this is great as when I have finished a book I can just slide it back out and add a new one. That's the beauty of this as if I was using an ordinary book that I have sectioned off I find that I finish one section before another so have to start a new book even when I have space in the other section. Now I don't need to worry about that. YAYYYY!!!!!
So here is the large book...
For my blog...
For my ideas...
For the Silhouette UK Design Team...
Here is the smaller book...
I hope you find this tutorial useful and it inspires you to have a go. Like I said it's quite simple but I will be using these from now on, making use of my supplies that I already have and no more buying note books HA!
'Til next time
C x
blog
Products Used
PRODUCTS USED:


Gorgeous project - as always
ReplyDeleteThanks Karen, I have used my notebooks to bits, C x
DeleteGreat tutorial. I bought some of this some time ago but I haven't even opened it ....yet
ReplyDeleteOh my goodness, I am in love with this stuff, sooooo durable yet bendy, such an interesting look! C x
DeleteCaroline this is such a lovely and easy-to-follow tutorial! I love the way you've made the leather look worn, it's so much prettier than having it neat! You're such a clever lady. X
ReplyDeleteThanks Hannah, the faux leather is pretty amazing and totally agree, I love the worn look. Seriously you just can't tear or break it, it's fabulous! Have a go at making one! C x
DeleteOK. I now neeeeeeed one of these in my life! You're such an inspiration Caroline. Absolutely gorgeous, as always! xx
ReplyDeleteYou so dooooooo, I use mine constantly! I like that you can just update one book with a new one so easily! Thanks Nicola C x
DeleteI love this C. Think I will have a go at making one for on my desk at work :) I don't have faux leather stuff could I make the cover from grunge paper covered in pretty paper?
ReplyDelete