
 |
To help get you started, you can download the free Silhouette compatible file which includes the heart frame and bunting lines. This is sized for A4 paper, but feel free to resize to fit the dimensions of the frame you'd like to use.
What you’ll need:
- Silhouette CAMEO
- Paper or Card
- Picture Frame
- Free Silhouette Compatible cut file
- Optional Silhouette Design Store files
- Bird on a branch Design ID #74007
- 6 Hearts Design ID 54935
- LW Perfect Print Font Design ID #55154
STEP ONE: Download and Open the Free Cut File
Download the free Silhouette compatible cut file. Launch Silhouette Studio and then open the file from within Studio.
STEP TWO: Add Love Bird
Resize Design ID #74007 to 8.7cm wide and place in the top left corner of the heart frame
STEP THREE: Divide Design and Create Mr Birdie's Wife
I wanted to give the little birdie a partner, so used the knife tool to separate him from the branch. Similarly, separate the heart for use in other parts of the design.


Now, at this time, you might expect to weld everything together. I don't do this though, I prefer to fill colour everything the same colour and simply Group. The reason why I prefer this way is that once welded, reversing your actions is difficult, in fact I only know of the undo button. In case I want to make changes later on, I just group everything as I go and Weld at the end.

STEP Four: Create Banner Strings
I have included the strings that I used to help get you started. If you'd like to create new ones, use the Draw Curve Shape button, highlighted in the screenshot below, on the left-hand side menu. My main tip here is to have only the beginning and end node and not have lots of points along the line. The handle bars allow you to curve the shape which I think is easier and smoother than working with lots of separate points on the line.
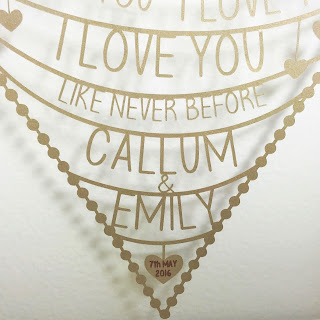
STEP Five: Add Your Text
This step is where the magic happens.Type your text as normal, I used LW Perfect Print Design ID #55154. My font sizes ranged from 40pt to 70pt. The repeated 'I Love You's got progressively bigger, starting at 50pt, then 60pt and finally 70pt.
To make the text hang from your lines, use Silhouette text to curve functionality. Here is a screenshot, and I have also created a very short video as it's a super easy process, but I find it hard to describe!

STEP Six: Offset Lines to Create Bunting Strings
I chose a 1mm offset, but as this is above and below the line, the resultant bunting strings were 2mm thick.
STEP Seven: Complete Remaining Text and Weld
Repeat steps 5 and 6 for the rest of your text. Once happy with the final design, Weld.
STEP Eight: Cut
I used a sketch pen to write the date in the heart at the very bottom of the design. I coloured this text black, whereas the rest of the design had grey lines. This allowed me to use the line colour option in the advanced section of the Cut Settings window.Look how pretty the design that was left on the mat was!

STEP Nine: Mount in Frame
I used washi tape to attach the papercut to my mount. Washi tape is great because it allows you to reposition without any dramas! The rectangular edge is hidden by the mount, so the heart appears to be floating.My frame is a shadow one, and as my design is quite big, I decided to sandwich the papercut between the front pane of glass and a sheet of 2mm acrylic, ordered cheaply online. I could of course add the backing card directly on top of the papercut, but I like the shadows that the design produces when there is a gap between the papercut and the back of the frame.

Finished Product


This type of design is very flexible, you can print or sketch instead of cutting. I decided to make a matching card, using sketch pens on vellum. I really love the final effect with the vellum and gold together!


DESIGNS USED:
 |
 |
 |
PRODUCTS USED:
 |
 |
 |
Thanks for sharing your beautiful project with a clear tutorial and a free file as well.
ReplyDeleteVery generous Nadine, and I hope lots of readers will try this out!
ReplyDeleteGreat tutorial thank you and thanks also for the free file
ReplyDelete