
I'm pleased to say that I finally found some time to play with my Silhouette Curio™ using felt and the Silhouette Deep Cut Blade. I adore working with felt as I used to design and make felt toys and storytelling props, so I'm very excited to share my felt cutting technique with you.

The pattern pieces needed to make this needle case are derived from one of Lori Whitlock's square background shapes. I haven't included detailed instructions on how I made the pieces (the diagrams should show you what is required), but if you'd like to know more, ask questions or even request a tutorial, please do so in the comments below.

Most felt can be cut on the Cameo or Portrait if it is backed with an iron-on stabiliser such as one of the Silhouette Fusible Fabric Stabilisers (Clean Cut or Cut & Sew). However, because of its solid base and its ability to use the Deep Cut Blade, I have found that the Curio can cut felt without stabiliser. I am sharing the method that I use to cut felt in this tutorial and I also describe how to protect and temporarily adhere the felt to the cutting mat using regular vinyl.
N.B. the Deep Cut Blade is NOT designed for use with the Cameo.
SUPPLIES NEEDED:
Felt Sheets (I used a wool acrylic blend)
Embroidery Thread and Needle
Ribbon or Snap Closure
Silhouette Curio™ with Standard Base
Deep Cut Blade (Regular blade if felt is on the thin side)
Vinyl or Contact Paper
Clear Adhesive Tape
SOFTWARE SETTINGS:
The Curio uses the same Silhouette Studio® software as the Cameo and Portrait but the Curio options don't show up until the Curio is attached and switch it on. If you are not sure how to display the Curio software options, how to select and fit the platforms or how to load the base, I recommend that you watch this video from Silhouette.
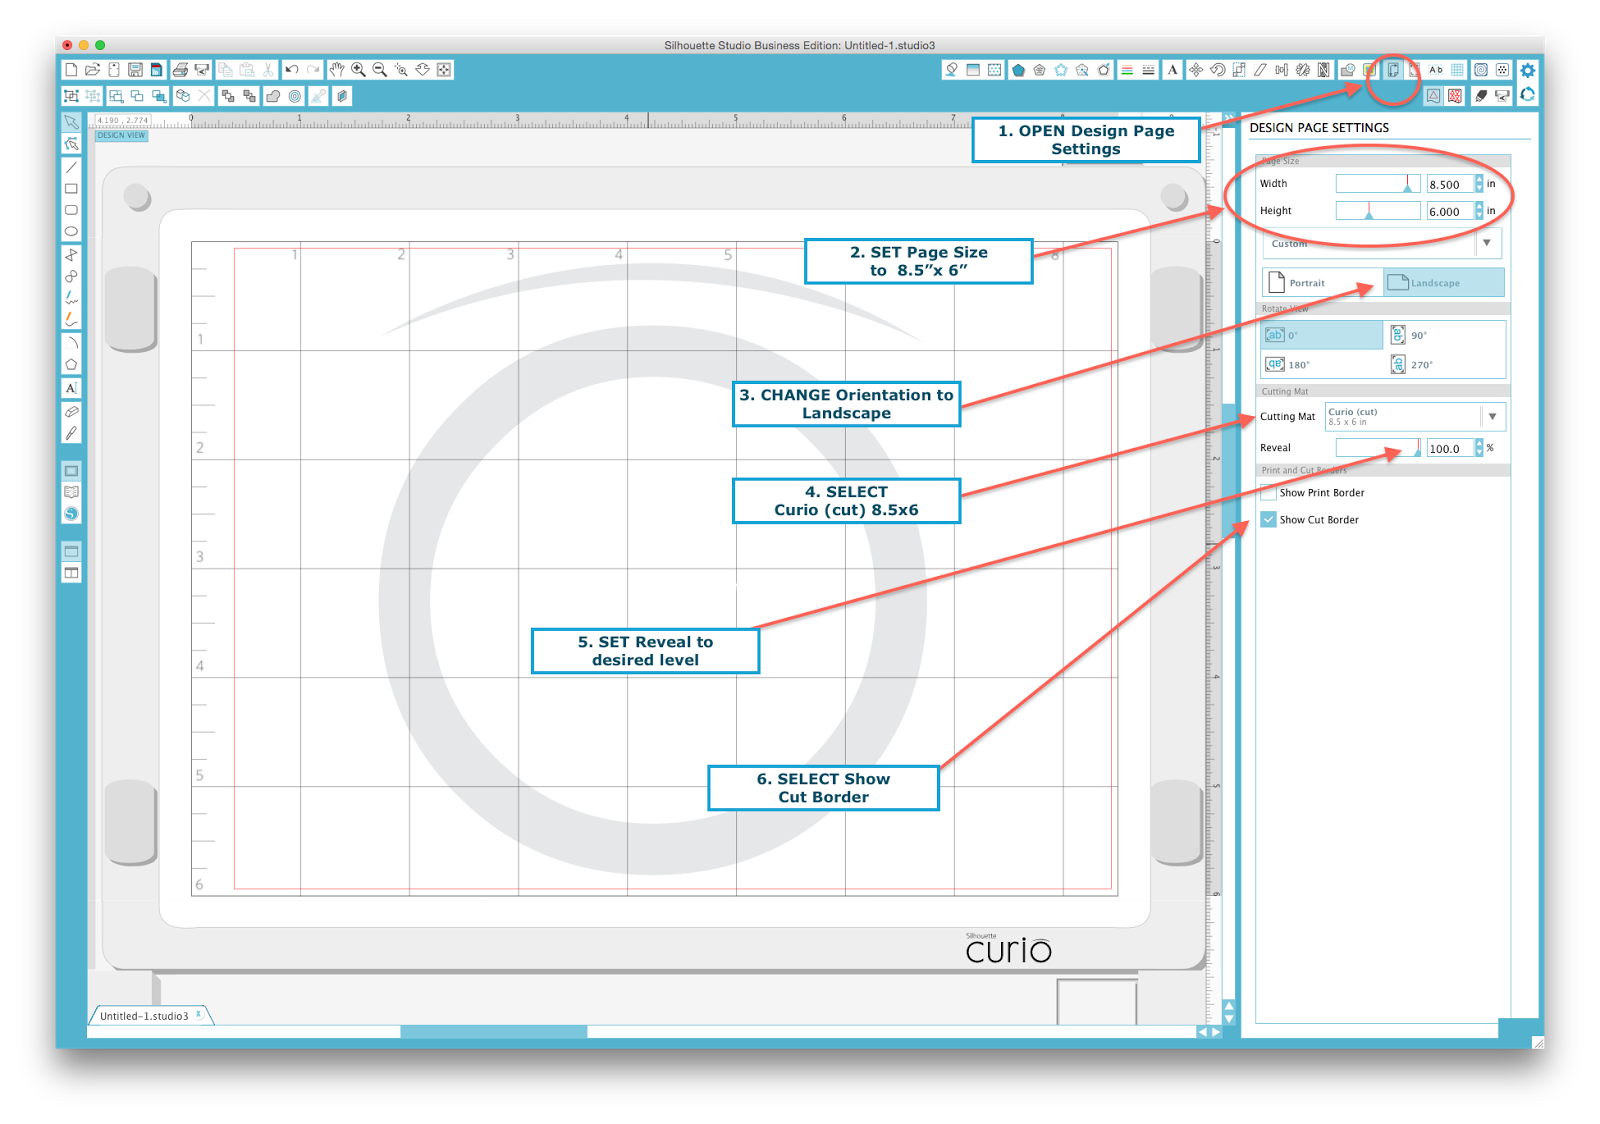
To prepare the software to cut felt on the standard Curio base I make the following changes to the software settings:
- Open the Design Page settings
- Set Page size to 8.5" by 6" (even if media is smaller)
- Change Orientation to landscape
- Select the Curio (cut) 8.5 x 6 mat
- Slide the reveal to where the mat and numbers are visible and
- Tick show the cut border.
PREPARING TO CUT:
I recommend that you cut one of the larger pieces first from a piece of felt just slightly smaller than the mat. Firmly press the felt piece onto the vinyl. It is best to add the felt while the platform is on firm surface. I also firmly roll a clean brayer across the felt a few times. Once in the machine the platform is very much like a CD drawer and too much downward pressure without a support may damage your platform or machine.
In cut settings I choose Fabric (canvas type). The software indicates 6 platforms should be used. That is, 2x thick platforms, 1x thin platform and the cutting mat (which also is thickness of 1).
I used a blade depth of 8 on the first cut and 9 on a second pass, with a third pass on 9 if needed. I cut the remaining pieces one at a time centring each piece of felt on the cutting mat and in the software using pieces of felt on the mat slightly larger than the cut piece requires. When the felt starts to move as the vinyl gets less sticky, replace the paper, or secure the edges of the felt with some masking tape or the clear material fasteners (included with the Curio). Some of the pieces may require a little manual trimming with scissors as the picture shows.

Most of the pieces cut beautifully but the decorative frame and the smaller needle pockets (below) lost some of their definition. When hand cutting felt I often used clear tape on top of the felt to improve the cleanness of the cuts and I employed the same technique with the Curio. I re-cut distorted pieces from felt covered with clear, wide parcel tape (in the picture above far right). As you can see from the picture below it achieves far better results (with tape on the right, without tape on the left).

The picture below shows the final pieces cut and ready to sew. You might notice an extra heart has appeared which I cut from the waste square from the frame.

Once the pieces are cut its just a case of stitching them together. Machine stitching gives a precise finish, but I favour a more rustic, hand-finished look. I use a plain running stitch with 3 strands of embroidery thread in this order:
- Heart and frame to outer (blue)
- Blue pockets to inner (white)
- White panels to middle (coral, not blue as the picture above suggests)
- Inner (white) to middle (coral) down the centre (right sides together)
- Fold inner (white) in half and sew close to the edges (wrong sides together)
- Thread ribbon through slits in outer (blue) or attached a tap and snap fastening
- Sew outer (blue) to middle (coral) close to the edge.

... and the job is done! (It sounds complicated, but it really isn't) and its time to fill it with your favourite pins and needles.


I hope you enjoy working with felt and the Curio as much as I did. Do share your makes and ideas in the comments or on the Silhouette UK Facebook Community Page.

Profile | My Blog | Pinterest | Twitter | Instagram


Lovely project Janet - yet another filed away to make in the Summer Holidays x
ReplyDeleteThank you Karen. I love a project that is useful too.
DeleteGreat tutorial Janet...I am looking forward to trying out your techniques soon...some great tips on how to use the Curio with with basic supplies like contact paper and parcel tape. Thanks x
ReplyDeleteThank you. I'm looking forward to seeing your results.x
Delete