
Ages ago I bought a little mdf bird house from B & M stores, but you know how it is, it sat in my box of "things I intend to do". Then today I got up to a cloudy morning and thought I need to do something to make me feel more Spring like. So that is how my Bird House of a thousand flowers (millefiori) was born. You may be relieved to know it only has about 100 flowers on it!
EQUIPMENT:
Mdf Bird house such as from The Decopatch Place
Paint brush
Some left over paint e.g. from a tester pot
Card stock
PVA glue
Docrafts glitter glue for decoration
Self sticky pearls
Sticky foam pads
Craft wire or a short piece of chain

1. Paint your house in a base coat. Allow it to dry over about one hour.
2. Cut out approximately 50 small flowers for each side of the roof. I used this file that comes free with a Silhouette Cameo 2, and used the central, six petalled flower, removing the central hole. You can use anything similar.

Attach with glue of your choice. I used PVA glue so I could move the flowers around a little before they set in place.

3. I opened the free Silhouette file ID #77791, ungrouping the shapes and releasing the compound path of the front of their bird house. I cut the front out of copier paper, tried it for size, then gradually changed the position of the holes for the entrance and the perch until I had a piece that fitted perfectly over the front of my mdf house. Once I was happy with it, I cut out a piece of lilac dotty card stock and glued it in place.
4. I liked the overhang trim of the roof from the free file, so I altered it by using the knife as shown here. I then measured against the slanting side of the house and cut it once more.


5. I replicated a mirror copy and overlapped the two pieces, welding them together. To start with I welded the two scalloped pieces together at an angle of 45 degrees, but once cut out I realised they would fit the mdf better if welded together at an angle slightly less than 45 degrees (see the photo of the finished house). I find Trial and Error is a wonderful tool in your craft box!
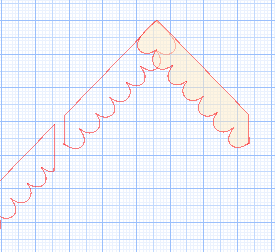
6. I made small 2mm circles and took a heart shape from my library. I placed these in position and once I was happy with them, selected them all and made a compound path as shown.

I filled the roof trim shape with one of my dotty design backgrounds in a toning colour.
7. The birds were made from Silhouette design ID#1188. I ungrouped the shapes and made the the eye circle black. Because I was cutting the doves from white card I chose to outline their shape in black. Click on the shape of the bird body, pick black line colour, line style and choose a thickness for the outline. The eye and bird body are regrouped and set to edge cut only. I replicated the wing shape, outlined them, picked background fills for them, and grouped two wings together for the flying birds. They were set to cut edge only. I cut two birds for the adults and then made mirrored images at 75% size for the baby birds.
8. The birds bodies were all covered in Docrafts glitter glue and allowed to dry. Once the wings were attached, the birds were glued in position, using foam pads for the bird on the perch.
9. To make the sign I used file ID #27839 by Lori Whitlock filling it with a dotty background and adding a Welcome message in white. Two circle holes were added either side. I made two "D" rings by using a suitable letter D and cutting that out. Attach the sign with craft wire or short pieces of chain links.
10. Self sticky pearls were applied to some of the roof flowers.
This project certainly takes a couple of hours, but I think the effort is worth it don't you? No doubt you will have worked out that you can always take the easy option and simply make the house totally out of card stock using the Silhouette bird house file and decorating that instead! I would love to see any of your bird houses if you chose to make this.


FILES USED:
Flower ID
Bird ID #1188
Bird House ID #77791
Bracket tag ID #27839
PRODUCTS USED:
 |  |  |
This is soooooo cute Hilary
ReplyDeleteThanks Karen. I was really pleased with the outcome!
DeleteThis looks fabulous Hilary! Denyse x
ReplyDeleteThank you Denyse. I hope you will have a go!
DeleteSuch a pretty project Hilary!
ReplyDelete