Hello, Janet here with a quick and easy project for the Silhouette Curio™-
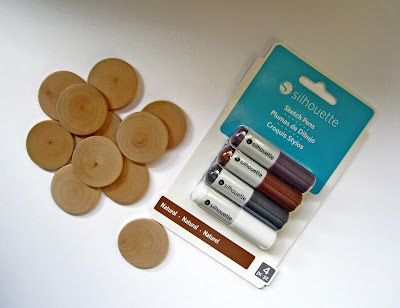
I've used one of the NEW sets of Sketch Pens. The Natural set contains four pens in; Brown, dark brown, grey/charcoal, and white. The darker colours all have a subtle glimmer to them and they all seem more juicy than the older versions. I've made a children's seaside-themed game by simply drawing on wooden discs with the pens using the Silhouette Curio™. Within the instructions I show you how to make a template for accurate placement of the designs onto the discs, which would also work with circular blanks in other materials, and for engraving as well as drawing.
I tested the colours on card to see which one I'd prefer for this project. I loved the white and grey, but they didn't look sufficiently rustic. Both of the brown pens looked great, but I finally chose the lighter, more reddish brown (in the centre of the test paper).
WHAT YOU'LL NEED
Flat Wooden Discs (1.5"/3.8cm circles)
Silhouette Sketch Pens in Brown (NEW Naturals)
Silhouette Curio™ with Regular-sized Base and Cutting Mat
Silhouette Chipboard, or thick card
Downloaded Seaside Designs (#27917, #84503, #46674, #43866 or similar)
Small Drawstring Bag in Canvas or Hessian
STEP 1: PREPARE THE DESIGNS
Measure one of your discs across its diameter. Draw a circle of the same diameter in the Silhouette Sudio® software using the Ellipse tool (hold down Shift to make it circular). Place it in the top left on your virtual mat, open the Replicate Window and click on Fill Page. At this stage the size of your Design Page doesn't matter as you will change it later.
Open all the designs (or similar ones) in the software in the same window as the circles.
To do this close all tabs except the one with the circles. Go to the library and double click on one of the files. This file will then be opened in the window with the circles. Move these new images off the mat. Revisit the library and do the same with the next file. Repeat until all files are in the same window. N.B. If you need to open files in separate windows, click File > New before clicking on each design icon in the library.
Reduce the size of each group in turn to a size that will approximately fit a single design element into one of the circles.
Ungroup the designs if necessary and move the ones that you like into circles (some, like the seagull will need to be layered up to make the complete design). I have added extra detail to some of the designs. I'll show you how below.
For the Crab:
Select the design. Open Offset Window. Click Internal Offset, change distance to 0.05 in. Select Round, click Apply.
To add pattern to the crab's back in Silhouette Studio® Designer Edition, select the larger of the new shapes and open the Sketch Window. Select Plain in the Edge Sketch options, and Diamond Hatch for the sketch Fill. You can play with the advanced options to refine the pattern if you wish. In the regular edition of Studio you can draw a pattern with the drawing tools, or add one or more extra internal offsets. You can also use the Emboss/Deboss fill effects (note, these can only be accessed when Curio is connected).
For the Turtle:
Simply add extra lines on the turtle by adding a series of internal offsets. Hint: To make the 'shell-shaped' pattern, make small internal offsets until you make one with no 'legs'. Use this one to make successive external offsets, and then return to it to make the internal ones too.
I chose four of the images to continue with.
STEP 2: MAKE THE TEMPLATE
Ensure that your Design Page Settings are set for Curio mat and paper size. These may only be visible when Curio is connected and switched on.
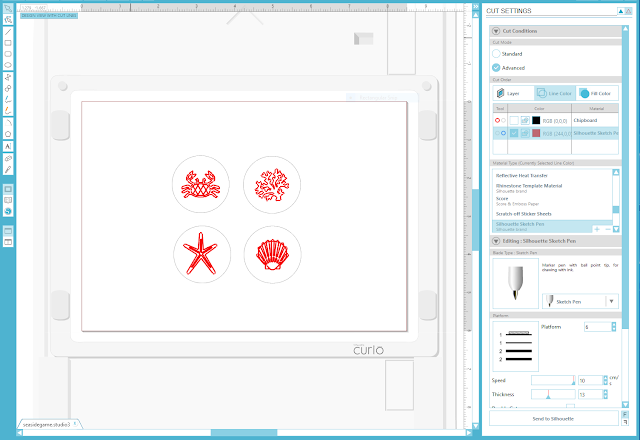
Copy your chosen images with their circles to the virtual cutting area. Change the line colours so that the circles and the designs are different. I have circles in black and designs in red.
Open the Cut Settings Window and tick the Advanced Cut Mode. Select Line Colour in Cut Order and set the following as per the settings and screenshot below:
Black Lines, Red Tool, Chipboard. Edit Chipboard Setting if necessary (I reduce the Thickness to 31).
Red Lines, Blue Tool, Silhouette Sketch Pens. Reduce Thickness to 13.
Using 6 platforms as indicated in the cutting instructions (2+2+1+ Cutting Mat), place a ratchet blade in the left-hand tool holder (red circle) and the sketch pen in the right-hand tool holder (blue circle) as in the photo.
Trim a piece of chipboard to fit Curio mat and carefully align it with the top left corner and press onto the mat. Remove the tick from the red cut lines (make sure there is a tick for the black lines) and press Send to Silhouette to cut the circles (do a test cut first if you haven't cut this media before). Then carefully remove the chipboard circles leaving the template on the cutting mat.
STEP 3: USE THE SKETCH PENS
Now select the the red lines and deselect the black ones. I edited the Sketch Pen setting by reducing the pressure (thickness) to 13, as I find that the ink flows more evenly if the pressure is lower. I also chose Double Cut so the pen would make two passes, useful where the surface is uneven (as on these wood blanks).
Before commencing to draw, remove the platform and reduce the number of platforms equivalent to the thickness of the wood blanks. Mine were about 2mm thick so I used a total of 4 ( 2+1+ Cutting Mat). Press the wooden discs into the holes in the template. If you feel your blanks need more adhesion, carefully add a piece of vinyl or wide adhesive tape between the chipboard template and the mat, sticky side up, and replace the template. Reload the platform and Click Send to Silhouette to start the pen drawing.
Once the pen has finished remove the platform, or Send to Silhouette once more if you think the results should be darker.
STEP 4: MAKE & PLAY THE GAME
Replace the discs with a fresh set and draw again. Repeat with the same designs or with fresh designs as required.
For a simple Snap/Pairs game:
Make at least 2 sets with a minimum of one set of designs for each player. Lay out an equal number of discs face down in a grid pattern in front of each player. Take turns to reveal one disc, and the player who calls snap correctly when a pair is revealed keeps the pair. The winner is the player with the most discs when one player has no discs left.
For a Matching Activity (for a younger child):
Draw a larger number of single designs. Print out a complete set of the discs on paper and laminate (I used a simple screen shot).
Place the finished discs in a small drawstring bag.
I'm sure you'll find even more games to play with the discs. Of course you can choose other subjects or themes which have greater appeal to the age and interests of your children such as dinosaurs, jungle animals, Harry Potter items, or even astrological symbols. Do share your ideas with us in the comments below or your pictures on the Silhouette UK Facebook page.
Bye for now,
DESIGNS USED:
 |
 |
 |
 |
 |
 |
 |
 |
 |


Loving those new colour sketch pens! They are on my list. I love drawing on wood as well as using the pens to write cards etc. Where did you find those cute wooden disks....they make a lovely retro style gift don't they!
ReplyDeleteThanks for another detailed tutorial x
Thank you, this was a fun project. The discs were from Hobbycraft, Lara's Crafts, 1.5", 3.8 cm, 22 discs in the pack.
DeleteThanks Janet
DeleteThanks Janet for a very interesting tutorial.
ReplyDeleteYou're welcome!
Deletefantastic tutorial! Thank you so much and great idea's.. the wheels are turning.. :)
ReplyDeleteThank you Peggy. I have a few ideas too ... !
Delete