Hello. Here on the Silhouette UK Blog this week we've been using Silhouette Glow in the Dark Heat Transfer Material. It can be used like other Silhouette heat-activated vinyls; that is, it can be cut with a Silhouette, and applied using an iron or heat press.
I decided to design my own bottle bag decal in the Silhouette Studio software, and I'm sharing my steps with you here. The same technique could be used for t-shirts, bags, or just about any other blank fabric item. The magical element is the Glow in the Dark Heat Transfer which glows really brightly when the lights are doused, and contrasts well with orange Silhouette Flocked Heat Transfer.
To make the design I used a partial "knock out" technique on one of the words using a ghost design. This gives the lettering and the ghost a more cohesive look. Of course, is would have been possible to place the ghost at the centre and carry out a complete knock out. However, for this design I wanted a longer decal and this seemed to work well for this shape of bag.
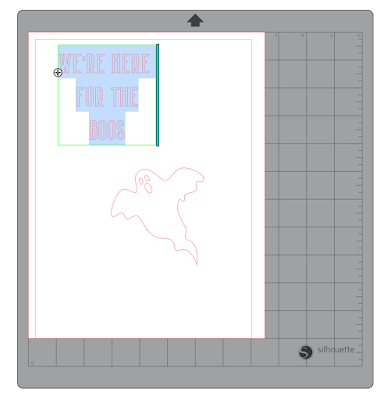
STEP 1: Bring in the Design Elements - Open the decorative elements file (I used the Haunted House Silhouettes by Michelle Renee). Ungroup the designs and delete all but the ghost. Click on the Text tool and type out the wording. Select the text, open the Text Style Panel, and select your chosen font. I used the CG Posh decorative font from the Silhouette Design Store. Click on the text and centre it within the text box (select text, and click Centre Justify in the Text Style panel).
STEP 2: Refine the Text (Manally Justify) - Increase the text size of the bottom word until it is in proportion with the ghost. Ungroup the text and delete unwanted text (I deleted some whole words), and reduce the size of some words to make the rows of similar width. Arrange individual letters until you you are pleased with the layout.
STEP 3: Knock-out Technique - (a) make an offset - Move the ghost closer to the bottom word and make an offset (select the ghost, open the Offset panel, reduce the offset distance to 0.1", and click apply.
STEP 4: Knock-out Technique - (b) refine the offset - Move the original ghost away, select the offset, right mouse click, then select Release Compound Path. Delete any unwanted small parts.
STEP 5: Knock-out Technique - (c) subtract the offset - Bring the ghost to the front (right mouse click, Bring to front), select both ghost and the word 'Boo', open the Transform panel, and click on Subtract. I often forget, but its always the bits at the back that remain (with a cut out), and the piece at the front that disappears. If you get it wrong first time just undo, rearrange as described and repeat the subtraction.
STEP 6: Arrange and Group the Decal- Move the ghost into position and group pieces that will be cut from the same colour of media together (I coloured them too to get a better idea of how the design will look).
STEP 7: Re-size the Design - Re-size the complete design to fit the bag, leaving a generous space around the design to allow for the curvature of the bag when it has a bottle inside.
STEP 8: Cutting Glow in the Dark Heat Transfer - Separating the groups of coloured pieces, draw rectangles (weeding boxes) around each group. Reverse both groups horizontally (right mouse click, select Flip Horizontal) either now, or at the cutting stage. Cut the glow media using 'Heat Transfer, Reflective' as a starting point. I found that I needed to cut it again with a higher blade setting (Blade 2, Force 10). Place the media shiny side down and either feed it directly into the Silhouette, or place it on a mat. I prefer to use a mat, particularly when I'm unsure of the cut settings.
STEP 9: Cutting Flocked Heat Transfer - Cut the flocked media using 'Heat Transfer, Flocked' as the starting point. I was able to cut it successfully with the force reduced to 31 and with other settings as suggested.
STEP 10: Weed the Design Elements - Remove unwanted media from around the designs, and the internal parts from the ghost and from the letters (called counters, I've learnt).
STEP 11: Adhering the Media - Adhere the glow media first without separating the pieces. Because this part includes the top and bottom of the design, alignment is easy. The adhesive can be activated with a domestic iron with the steam function turned off, but a heat press is easier. Press only as long as it takes to lightly adhere the media, then peel away the backing sheet.
Next apply the flocked media. Use a heat resistant cloth or sheet to protect the glow media while you are applying the flock. When the flock has adhered, remove its backing, replace the protective sheet, and re-press for a few more seconds. Turn the bag inside out and press again for a similar time.
STEP 12: Finishing Touches - Turn the bag to the right side and it is ready to use. I made some bottle labels by layering the files linked below, printing them onto cream copy paper, then trimming them to fit the bottles, and adhering them with double-sided tape.
I do hope you'll try out the Silhouette Glow in the Dark Heat Transfer - its a dream to weed and apply and gives a fun effect.
Bye for now,
DESIGNS USED:

|

|

|

|
PRODUCTS USED:

|

|

|

|

|


Definitely a SQUEAL project - FABULOUS Janet.
ReplyDeleteFaith
x
Thank you Faith - I thought it was a bit of fun for the adults.
Delete