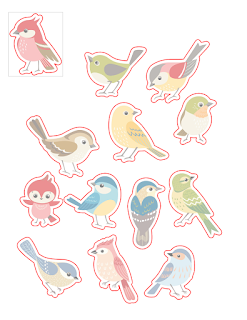
Hello, Janet from Crafting Quine Blog here again with more sticker hints. Last week we looked at some easy ways to use Print & Cut designs using the Little Bird Stickers by MiniLou (#284076). That post includes a general guide to Print & Cut too, so do check it out if you didn't read it last week.
This week I'm going to do more even more with this sticker set on Silhouette Printable Sticker Sheets. The ideas can also be used with any of the Silhouette range of printable sticker and foil sheets, and can be used with other brands, although the size of the sheets my be different. Some of the techniques require the Designer edition of the Silhouette Studio software, but I'll show you a work around if you only have the basic edition - same result, but just takes a little longer.
1. Mirror the Images
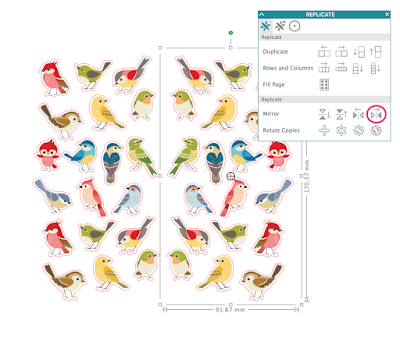
This one is so easy, it really should have been included in last week's post. Once you have your stickers in an arrangement you like, just select them, and from the menu brought up by a right mouse click select 'flip horizontally'. Alternatively, you can open the Replicate panel and select the 'Mirror to the right' button. Just one move and you have doubled the variations.
2. Selectively Cut Apart
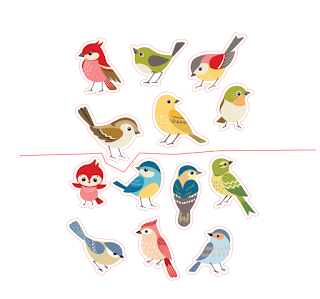
It is easy to make a full sheet of stickers by using your knife or eraser tools. If you recall the original sheet had thirteen little birds, and the manipulated sheet shown below has nineteen.
You can cut the designs apart using the Knife Tool. In the designer edition you can draw a continuous Polygonal (jagged) line.
Choose the options shown - Solid shape, Poly cut, untick Auto Apply
Draw your line through the bird designs, using a left mouse click where you need to change direction.
Then click on Apply, and you are able to more the two groups of birds apart.
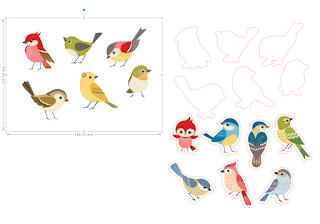
Select the outlines, right mouse click and click ungroup and all the outlines are separated.
I found it easier to move the designs around by first making two groups of outlines, the top set, and then the others and then to align and group them with the matching set of bird images.
The white margin can be reduced by dragging it tighter to the bird image, or by making an internal offset. Turn off the grouping first. Tracing is an alternative too, although I found that some coloured parts were too difficult to pick up using the Trace function.
It is also possible to split the designs using the eraser tool, although more time consuming. Make a duplicate set for insurance before you start. The Undo function is useful if you make a mistake along the way.
3. Select Individual Images
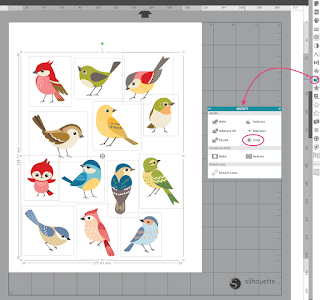
It is possible to separate every bird image using one of the above methods, but it would be very time consuming. The quickest way to divide up the images is to select both layers and to click Crop in the Modify panel. The boxes around each bird indicate that each bird image can now be used independently.
You can confirm that each has its own cut line by clicking on the Send tab, and turning on the cut lines.
The designs can then be arranged independently as you wish. They can even be made into stickers of a different shape (note they still have a white margin around them).
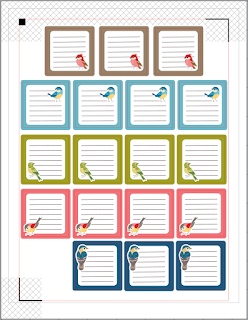
4. Make Matching Stickers
It is easy to design matching functional stickers using colours taken from the bird designs using the Colour Picking technique. Making a colour swatch is optional. You can read how do it here.
These custom sticker designs are easy to make by using the drawing tools to layer rectangles and lines, then adding individual bird images. The cut line from the bird image needs to be removed or set to 'no cut' to Print & Cut these successfully.
I hope you've seen how versatile these sticker designs can be. It's worth taking the time to experiment with them.
Here is the link the earlier post with the Print & Cut Guide and more easy tips with sticker designs - just click on the picture below.

|
Let us know how you get on.
Bye for now,









ANother great post Janet, thank you
ReplyDeleteFaith
Thank you Faith. I hope it is useful.
DeleteGreat post Janet and I love the bird designs!
ReplyDelete