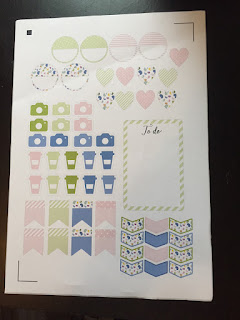
I have to admit, I am kind of obsessed with planner books and journals. And especially planner stickers. Imagine my joy when I discovered I can make them myself with the Silhouette machine! This tutorial should help you on not only make your own planner stickers, but also how you can make your own pattern and use it in your stickers!
Supplies needed:
Sticker paper
BANNERS Design (ID #48734)
HEART Design (ID #57836)
Silhouette CAMEO/PORTRAIT/CURIO
1. Making your own pattern:
Ungroup the assorted paisley set and color each paisley in the design color. Once you've done that, group them and duplicate on the right and bottom till you have a pattern. Set your page settings to my printer page size.Now you need to save your pattern as a jpeg file. This is the step to take: PRINT > PREVIEW PDF > EXPORT> SAVE FILE AS JPEG. Choose high resolution, I do mine around 300 dpi.
Once its saved as jpeg. Open your library and go into your pattern file. Drag and drop your jpeg file there. (These steps are according to my Mac, windows users might have to do it in a different way.)
2. Making the different sticker designs:
The circle design:1. Start with making a circle.
2. Do an internal offset 0.5 cm. Cut the inner circle making sure you have put the cut option at solid. 3. Delete the top half circle and select the half bottom circle with the outer circle and choose compound path.
The camera design:
Open the free design. Do an offset of 0.6 cm. Release compound path on your offset shape and remove the round shape in the middle.
The coffee design:
Open the free design. Do an offset of 0.5 cm. Release compound path on your offset shape and remove the inner shape.
As I wanted the heart to be a bit taller than what it was, I adjust the shape a bit.
The banner design:
Make a duplicate of the banner, and use the knife to cut part of the top off.
Delete the bottom part and place the top part on top of the first banner.
The chevron arrow design:
Add an offset of 0.2 cm.
To do list design:
Make a rounded rectangle and do an internal offset with sharp corners.
Now is the fun part with choosing colors and size. I wanted my colors to match the pattern that I have created. So for the different shapes, I would have one or two that have the pattern and then have four or five that have similar color to the pattern. I used the color picker to get the exact same color as the pattern. Resize your designs so its a good size for you to fit in your planner.
On the to do list, add "to do" using the Yellow Daisy Font.
Add registration marks on your page and fit everything inside the registration marks.
Now go to your cut settings and make sure it set on cutting only the edges of your shape (on most it would be to cut the edge of your offset.)
Print your design on sticker paper and cut with your machine using the sticker paper settings.
Now that you have the main shapes, you can save this design to your library and change the pattern and color according to your mood or season! Hope you enjoyed these small tutorials and show me what you make with these designs.
DESIGNS USED:
PRODUCTS USED:
 |
 |


No comments:
Post a Comment