Fancy a bit of a challenge? My name is Hilary, and today I am making a 3D shadow box card from a design by Lori Whitlock, but with a little twist of my own.
I remember going to the pantomime as a child and loving the way the scenery would layer in at the sides, so that dancers could come in at different areas of the stage, and you visually got a feeling of depth. Then the lighting engineers could alter the lighting so that the scenery would become semi-transparent. It was magical! As I practised and experimented with this file, it occurred to me how the shadow box card looked like a tiny theatrical stage setting, and I thought that by using vellum I could create some magic of my own.
When the card is placed at a sunny window, light shines through, and when it is dark, a battery candle can be placed behind for more drama.
There is an excellent tutorial here by Lori Whitlock on how to put the basic shadow box card file together and if you have not made something like this before, I would definitely recommend a couple of practice runs, as I did. As vellum is rather thin, it made sense to keep the supportive card "windows", and just cut the vellum for the pretty details. This involves a little bit of work, but I think the result is worth it!
I would categorise this as a tutorial for those with moderate expertise.
SUPPLIES:
File: Lori Whitlock, Bluebird Shadow Box Card #84282
Vellum - 3 sheets of A4
Card stock - 3 sheets of A4
Glue
STEPS:
1. Making the vellum shapes
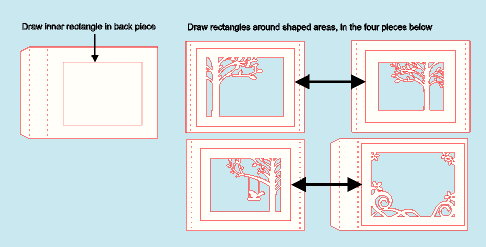
Open your file from the library and move it to one side of your design space. We will use those pieces later. Make a copy of the file and keep it on your design area (Edit/Copy/Paste). Ungroup the pieces as normal. You may need to ungroup them more than once. You should have 7 layers now separated. Delete the bluebird and the plain rectangle. You should be left with the peices as shown in image 1.
2. To cut out what will be vellum areas, continue as shown below. The size of the rectangle does not have to be exact, but you want a border big enough to apply glue. I find the pieces are easier to work with if you give them a fill colour. Any colour will do. Select two pieces, and when you hit Modify/Crop it acts like a biscuit (cookie) cutter whilst deleting the outer area at the same time. The inner rectangle for the back window should be around 9 x 11 cm.
 |
| Image 1 |
 |
| Image 2 |
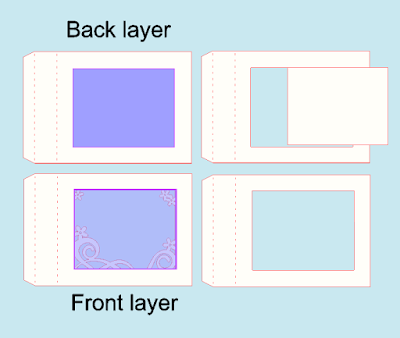
Using the copy of the original files that you previously saved beside the design area, bring them onto the design area. Ungroup them and deleted the unnecessary pieces (bird and rectangle) as before. You are now going to make the supportive window surrounds which will be cut from cardstock. Make the rectangular cuts as close to the original window aperture as you can, whilst removing all the shaped pieces. The window in the solid back piece of the box, where the stars will go, should be approximately 8.5 x 10.5 cm. See first row of image 3.
In image 3 I only show you two layers (before on the left, after on the right), but please note, the same operation must be carried out on all five pieces. For each piece, make a rectangle, place it in the centre of the area as shown. Select both pieces and go to Modify/Subtract. You will be left with the shapes as shown at the right hand site of image 3. Depending how your elements are grouped (i.e. the dotted lines and the surround), when you hit Subtract the centre may disappear, or you may have to delete it manually.
 |
| Image 3 |
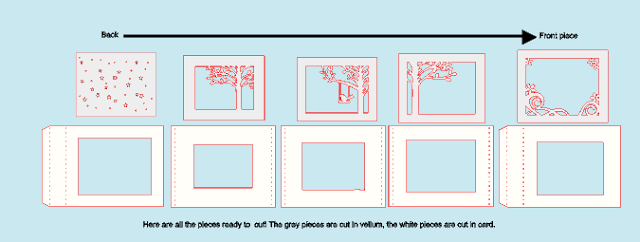
5. You can cut two shapes per A4 sheet. Select the shapes I have shown above in light grey. Pop vellum into your Silhouette on the carrier sheet, set the software cut settings, and adjust the machine knife accordingly. Do a test cut, and if everything is OK, cut out the 5 vellum pieces. When lifting the vellum off the carrier sheet, take great care not to tear or bend your design pieces. When vellum is bent or scratched you get white lines. Remove the vellum shapes from the cutting area, and start to arrange the card pieces (shown as white, above). You can fit two pieces on each A4 sheet.
Put your card into the machine, adjust the knife settings on the machine and within the software, and cut out the 5 card pieces.
6. I use a Scotch tape glider to apply glue down four sides of the back of each card window and carefully position and stick on the vellum. Your five layers are now complete, so it is time to have a close look at Lori's video, to understand how to actually construct the shadow box card.
MAKING IT YOUR OWN:
- By using "Print and cut" you could write a sentiment or personalisation on the front window of the card with Silhouette silver and gold pens. This would need to be done before cutting out the frames. Or you could cut a sentiment from silver or gold sticker material.
- You could make small embossed, cut and (even) coloured, vellum flowers on the front window.
- You could design your own vellum layers to make a completely different picture. For example, what about layers of growing flowers, or perhaps a garden scene of flower pot, boots, a wheelbarrow and a deckchair?
- I made the box from classic white card, but you could use patterned card for a completely different look.
The variations are endless, and the finished effect is very impressive. Amaze me, and amaze yourself! Come on...show and tell time!

PRODUCTS USED:
 |
 |
 |


Oh my word Hilary - this is amazing!
ReplyDeleteAww. Thanks so much Karen. It's a fair bit of work, but all the recipients have loved their cards!
ReplyDeleteBeautiful. You are exceptionally talented and patient. It looks really clever, and I am so glad to know you and watch you fly into all kinds of artistic expressions. Very well done, Hilary, very well done!
ReplyDelete