

SUPPLIES REQUIRED:
Silhouette Files
Card Blanks (5" Square)
Score and Emboss Paper or Watercolour Paper, (Curio version)
2 Shades of Watercolour Paints or Inks for each card (Curio version)
Water Brush (or paint brush) (Curio version)
Plain Printable Cardstock (Cameo/Portrait version)
Printer (Cameo/Portrait version)
STEP 1: Changing the File
This is my transformation to make a more universal sentiment for many occasions!


Now we'll use the Knife Tool to remove everything except the 'O' and the 'H' from 'Mother's'. These are the steps I recommend:
- Open the Knife Window,
- Untick 'Auto Apply',
- Select Straight knife,
- Ensure Solid Shape is selected,
- Make knife cuts to separate the letters and leave a tail on the 'H',
- Select one cut line at a time and click Apply Selected Knife. Continue until 'O' and 'H' are separated from the other letters, and move away the unwanted letters.

Next we need to tidy up the trimmed letters using Point Editing.

Here are the steps to do it:
Continue until you are pleased with the result. Then overlap the two letters slightly and weld them together. (Select both, click Object > Modify > Weld). Then arrange the words in relation to each other and group them (Object > Group).- Click Edit Points,
- Select individual points (grey boxes) in the areas indicated,
- Click Delete Point and continue to delete until any bumps are removed,
- Select Undo if you one delete too many (I did!),
- Select points around the 'too pointy' tail on 'H' and click Make Curve.

With the words displayed on the screen open the Polka Dot Lace file and centre it over the words. Select the lace file and stretch it centred and keeping proportions by using keyboard shortcuts (Shift + Alt + drag corner with mouse) to about 9"/230mm and then ungroup it (Object > Ungroup).

Select only the scalloped frame, open the Scale Window and adjust to make it slightly smaller than your card blank (my blank is 5"x 5"and I made the scalloped frame 4.8" square). To do this, untick Lock Aspect box and change dimensions in width and height to 4.8"/122mm.

We now need to delete the excess dots: the dots that overlap the words, the dots outside of the frame, and finally the incomplete dots at the frame edge.
You could do this manually, OR ...
Move the frame and words away. Group all the dots (select, Object > Group). Move the frame and words back. Make a copy of the frame (select frame, Edit > Copy, Edit > Paste in Front). Select dots and one frame, open the Modify Window and select Crop. After a few moments the outer dots disappear. Click in a space and the display simplifies. The dots have ungrouped in the process. The easiest thing to do now is manually delete the remaining unwanted dots and part-dots until it resembles the diagram below. Rearrange a few dots to balance the empty spaces.


For versions (A) & (B) It is easiest to make the scalloped frame, dots and words into one piece (with holes) by making them a compound path - select all those parts, holding down Cmd (Mac) or Ctrl (PC) click Object > Make Compound Path.
(A) Print and Cut
The compounded shape is filled with white and then overlaid over a plain or watercolour background. I filled the 5" card-sized square with an Ombre pattern downloaded from the Silhouette Design Store.


You could do this manually, OR ...
Move the frame and words away. Group all the dots (select, Object > Group). Move the frame and words back. Make a copy of the frame (select frame, Edit > Copy, Edit > Paste in Front). Select dots and one frame, open the Modify Window and select Crop. After a few moments the outer dots disappear. Click in a space and the display simplifies. The dots have ungrouped in the process. The easiest thing to do now is manually delete the remaining unwanted dots and part-dots until it resembles the diagram below. Rearrange a few dots to balance the empty spaces.
Finally, group everything and draw a square the size of your card blank (or slightly larger if you want to trim it) centred on the grouped design (select design, while holding Shift + Alt + Create Rectangle).

STEP 2. Completing Cards
I have three versions for you, A and B can be made on all the machines, C is a Curio exclusive.
- A - Print and Cut (single layer)
- B - Cut and Layer (cut layer over print-and-cut background)
- C - Deboss and Paint (Curio exclusive)

(A) Print and Cut
The compounded shape is filled with white and then overlaid over a plain or watercolour background. I filled the 5" card-sized square with an Ombre pattern downloaded from the Silhouette Design Store.

All the items can be selected, the line colour changed to clear, then grouped and Cut Outer Edge selected in the cut settings. The card front can then be printed as one piece with registration marks and then cut on the Silhouette. For more detail on how to do this check out Niki's tutorial A Beginner's Guide to Print & Cut. The card is finished by adhering the finished front to a card blank.
(B) Cut and Layer
An alternative is to use a cut and layer technique. This involves cutting the card in two pieces, the top part with holes from white card and the ombre layer printed onto white card which can be Print and Cut, or printed and manually trimmed.
The colour of the ombre can be adjusted by opening the Shader Effects Window and adjusting the Hue settings and then clicking on Apply effects.

The ombre layer is adhered to the card blank and then the top layer mounted onto the ombre layer with adhesive foam pads with the inner parts of the letters added with small or cut down foam pads too (a little fiddly, but worth the effort).

The Curio uses the same Silhouette Studio® software as the Cameo and Portrait but the Curio options don't show up until the Curio is attached and switch it on. If you are not sure how to display the Curio software options, how to select and fit the platforms or how to load the base, I recommend that you watch this video from Silhouette.
To prepare the software to deboss and cut on the standard Curio base I make the following changes to the software settings:

PREPARING TO DEBOSS & CUT (SOFTWARE):
Open the Emboss Window
Select Deboss (makes an impression INTO the paper)
Ensure Effect is set to OFF
The Deboss areas are shown in blue, and the cut lines in red. The green line is not being cut.

Now click on Adjust Cut Settings, or open the Cut Setting Window. Here are the steps that I recommend to set the deboss and cut tools.

PREPARING TO DEBOSS & CUT (PLATFORMS):
Attach the platforms to the base (totalling 5, 2 x thick + embossing mat), securing the snaps. Having removed the clear protective layer from the embossing mat, place the cut and emboss paper centred on the mat and use the clear material fasteners to secure the paper at all four edges (castellated edges on the mat, solid edges on the paper).

PREPARING TO DEBOSS & CUT (TOOLS):
The regular (ratchet) blade should be set to a depth of 1, loaded into the right-hand carriage and the fine embossing tool (white) loaded on the left. The left hand tool is set to work first by default.

Once the platform is loaded click on Sent to Silhouette in the software. The embossing tool will make two passes and then the blade will cut. The results on Score and Emboss paper are particularly good. Other soft, textured papers may work, but you may need to make additional passes of the embossing tool to get a deep impression.


If you make this, or any other item with the free file, do remember to enter it into the Silhouette UK Challenge. Use the Linky tool there to add a photo or link to a photo in your blog post.

The ombre layer is adhered to the card blank and then the top layer mounted onto the ombre layer with adhesive foam pads with the inner parts of the letters added with small or cut down foam pads too (a little fiddly, but worth the effort).

(C) Deboss and Paint (Curio)
For this version the top white layer is debossed on the Curio using the Fine Embossing Tool and hand-painted in the debosssed areas. The debossed effect is very attractive giving the look and feel of letterpress.
For this version the top white layer is debossed on the Curio using the Fine Embossing Tool and hand-painted in the debosssed areas. The debossed effect is very attractive giving the look and feel of letterpress.
PREPARING THE CURIO SOFTWARE:
The Curio uses the same Silhouette Studio® software as the Cameo and Portrait but the Curio options don't show up until the Curio is attached and switch it on. If you are not sure how to display the Curio software options, how to select and fit the platforms or how to load the base, I recommend that you watch this video from Silhouette.
To prepare the software to deboss and cut on the standard Curio base I make the following changes to the software settings:
- Open the Design Page settings
- Set Page size to 8.5" by 6" (even if media is smaller)
- Change Orientation to landscape
- Select the Curio (cut) 8.5 x 6 mat
- Slide the reveal to where the mat and numbers are visible and
- Tick show the cut border.

PREPARING TO DEBOSS & CUT (SOFTWARE):
Open the Emboss Window
Select Deboss (makes an impression INTO the paper)
Ensure Effect is set to OFF
The Deboss areas are shown in blue, and the cut lines in red. The green line is not being cut.
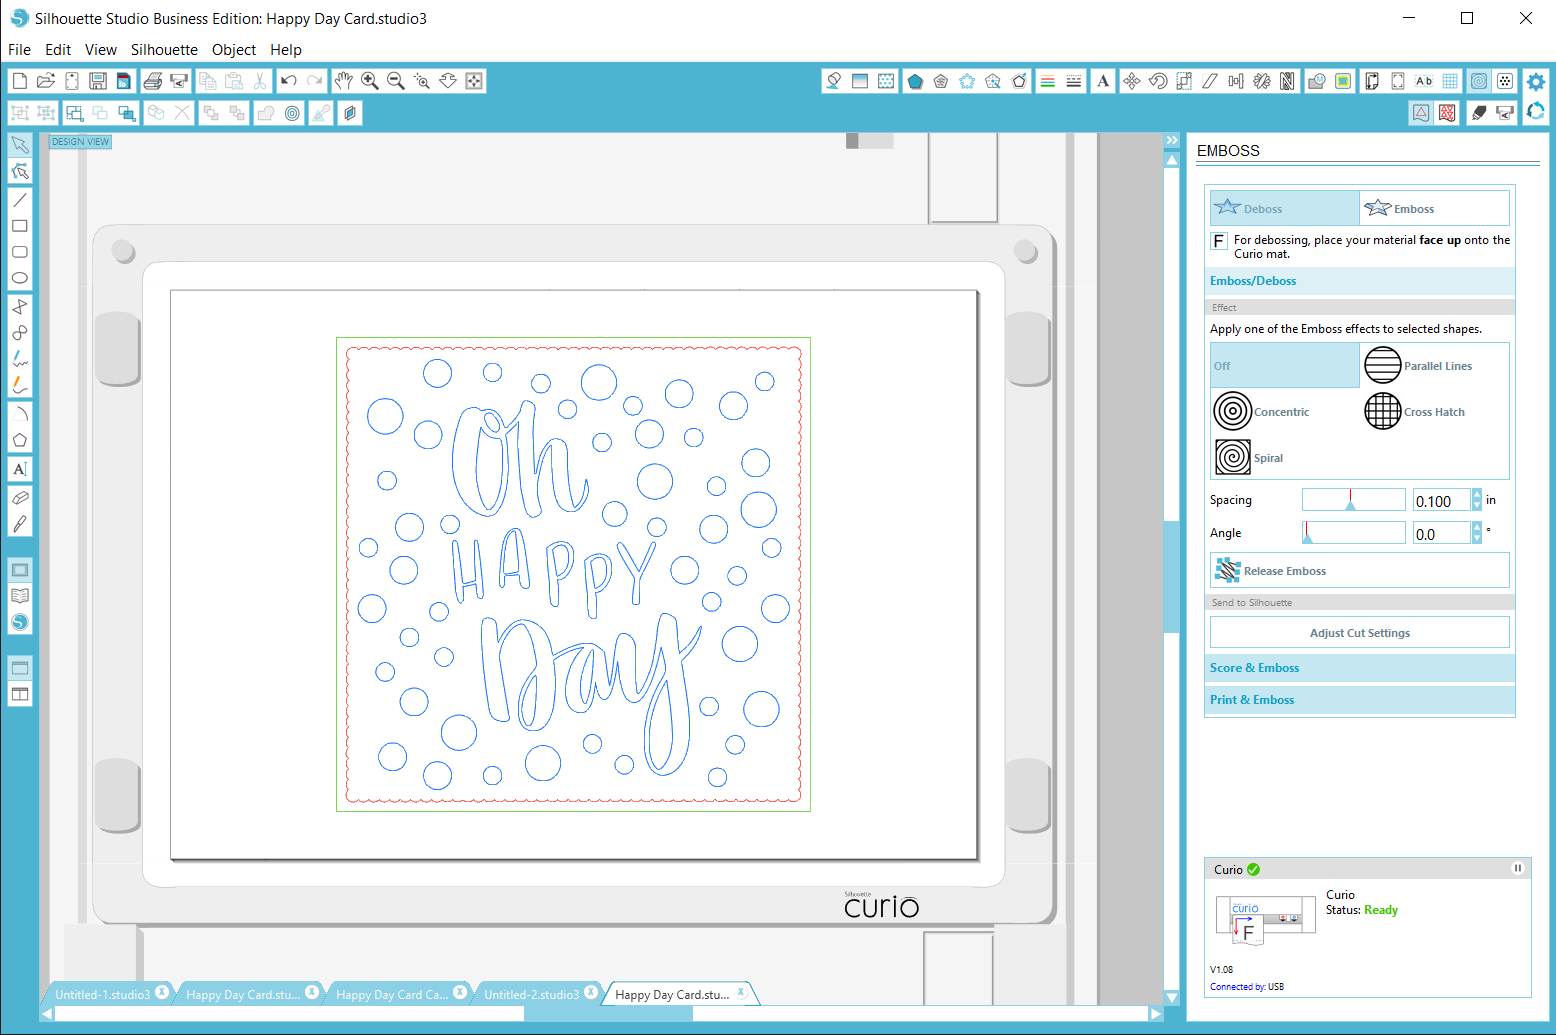
Now click on Adjust Cut Settings, or open the Cut Setting Window. Here are the steps that I recommend to set the deboss and cut tools.

- (Following the left box) Making sure NO lines are selected, Select Tool 1
- Choose the Emboss (fine) Tool & click to expand
- Leave the platform details at their defaults (shown) - note: 5 platforms required
- Tick Double Cut
- Then click on the lines to be embossed and select Cut
- (Following the right box) Select Tool 2, with no lines selected
- Choose Score (Score & Emboss Paper)
- Ensure the Ratchet Blade is selected - note Blade depth of 1
- Platform details can be left defaults
- Click on the lines to be cut and select Cut
Before sending to Silhouette, the platforms and tools should be prepared.
PREPARING TO DEBOSS & CUT (PLATFORMS):
Attach the platforms to the base (totalling 5, 2 x thick + embossing mat), securing the snaps. Having removed the clear protective layer from the embossing mat, place the cut and emboss paper centred on the mat and use the clear material fasteners to secure the paper at all four edges (castellated edges on the mat, solid edges on the paper).

PREPARING TO DEBOSS & CUT (TOOLS):
The regular (ratchet) blade should be set to a depth of 1, loaded into the right-hand carriage and the fine embossing tool (white) loaded on the left. The left hand tool is set to work first by default.

Once the platform is loaded click on Sent to Silhouette in the software. The embossing tool will make two passes and then the blade will cut. The results on Score and Emboss paper are particularly good. Other soft, textured papers may work, but you may need to make additional passes of the embossing tool to get a deep impression.
Remove the paper and paint the debosssed areas with 2 shades of watercolour inks (paints would work too).


To get the actual coloured margin around the design, colour the card blank directly with one of the watercolour ink pads masking off the rear of card. Once the painting is complete and dry, it can be attached to the card base.


If you make this, or any other item with the free file, do remember to enter it into the Silhouette UK Challenge. Use the Linky tool there to add a photo or link to a photo in your blog post.

DESIGNS USED:
 |
 |
 |
PRODUCTS USED:
(Silhouette versions)
 |
 |
 |
 |
(Curio version)
 |
 |
 |
 |
 |


