Saturday, 3 December 2016

Christmas Envelope Seals - 3rd Day of Christmas


Hi!, Bev here with another Christmas themed tutorial, personalised envelope seals.  I am one of the few people I know who still send out Christmas cards each year.  I love writing my list every year and sitting down with a Christmas film on and writing messages in each card.  So I thought these envelope seals would be the perfect addition to finish the look.

What you will need:
  • Silhouette Cameo/Portrait 
  • Silhouette White Sticker Paper 
  • Printer 
Step One:

Draw a circle in the studio using the elipse tool.  Keep it perfectly circular by holding the shift key at the same time as drawing.


Import the reindeer image onto the page and using the line and fill colours build up the image. You can choose any colours, I decided to stick with the more traditional colours.

Ensure that  shapes inside the circle are set to 'no cut', as we only want to cut the outside.


Resize to fit comfortably in the centre of your circle.


Next, open the text tool and write your text.  Use a seperate text box to write the sentence 'from the ..... family'.  Niki did a fabulous tutorial on curving text and you can read that here.


Next, copy the image of the reindeer and change the colour of the nose.  Resize and duplicate and pop them either side of your Rudolf.  Replicate your design to fill a full sheet of sticker paper.


Draw a box around your stickers and change the colour to green or another colour different to your red default settings.  This will enable you to use the advanced cut settings box and perform two types of cut.  One to cut through the sticker paper around the outside, and then a kiss cut on the actual stickers themselves.


Step Two

In the advanced cut settings box, choose your material (white sticker paper) and click onto each colour you want to designate a cut setting to.  I chose the cut settings for kiss cut and outline.  The kiss cut setting is Blade 2, Speed 4, and Thickness 7 (although for this particular paper, the thickness worked perfectly at 20) and for the outline Blade 2, Speed 4 and Thickness 30.

Print your sheet off and load it into the Silhouette machine.  Send it to cut and you are done!


I hope you have enjoyed this Christmas make and I loved sharing it with you! I can't wait to see what you create.

DESIGNS USED

Reindeer by Silhouette Design ID #23865
Scotchtape Font
 
PRODUCTS USED:


Light hold cutting mat for Cameo

Friday, 2 December 2016

Sliceform Christmas Tree with FREE Cut File - 2nd Day of Christmas

Video tutorial and free sliceform Christmas tree cut file for Silhouette by Nadine Muir

Nadine here with a free Christmas tree sliceform that can be used as decorations or within a pop up card.  They fold flat for postage or storage and need no glue.  I've included different sizes in the free download as scaling would cause the slot thickness to alter.  I'll also be back on the 11th to share with you the sliceform snowglobe.


What you’ll need

  • Silhouette
  • Free Cut File –Download here
  • Card / Paper / Acetate

I made a video to show you how these trees are constructed.  The process is very simple, but the construction order is important.  I think the video is the easiest way to see how this works, but I've also typed up some notes with the steps which is probably better as an aide-memoire once you've made a couple.


STEP ONE: Start At The Centre with A and D

Slide the two largest stapes, A and D together through their middle slots.

STEP TWO: Next Shapes B

Now slide the middle notch on  shape B through the notch immediately left of the centre notch of shape A.  Repeat  on the opposite side for the second shape B.  At this stage, you should have 3 trees going one way and one tree going the other - thats shapes B, then D then B again going through shape A.


STEP THREE: Then Shapes E

Use shape E to complete the grid, three trees going one way and three going the other.  This means shape E will slide through shapes B,D,B.

STEP Four: Clip Shapes C and F into position

Until now, we've been sliding the trees just one way into postion.  For the smallest shapes C and F, we need to 'clip' them into position.  The middle slot on shape C will slide downwards into the last slot in shape A, but will need to twist and clip into position to shape E's last slot.  This action is necessary to lock the tree and prevent slices sliding out.  In the same way, shape F slides up through shape D then slides into position to shape B.

STEP Five: Optional for large trees

The large trees have four triangles that just slot downwards into the last slots of shapes A and D.  I excluded these for the smaller trees, as they were just too small and fiddly!

FINISHED PRODUCT 

Sliceform Christmas tree forest.  Free cut file and tutorial by Nadine Muir for Silhouette UK

Small and large Sliceform Christmas trees.  Free cut file and tutorial by Nadine Muir for Silhouette UK

Small Sliceform Christmas tree inside acetate snow globe.  Free cut file and tutorial by Nadine Muir for Silhouette UK

Sliceform Christmas tree - Free cut file and tutorial by Nadine Muir for Silhouette UK

Sliceform Christmas tree folded flat.  Free cut file and tutorial by Nadine Muir for Silhouette UK

Sliceform Christmas tree from below.  Free cut file and tutorial by Nadine Muir for Silhouette UK

Sliceform Christmas tree - Free cut file and tutorial by Nadine Muir for Silhouette UK


DESIGNS USED:

Free Downloadable Cut File

PRODUCTS USED:

Light hold cutting mat for Cameo

Thursday, 1 December 2016

Christmas Santa Sacks - 1st Day of Christmas


Hello, Janet here with my post for the 1st Day of Christmas.The first of twelve posts of Christmas loveliness!

Last year I made drawstring cotton canvas Santa Sacks for the kids. This year I've been making more adult versions in hessian. These sacks don't have a drawstring, so need a band closure and a decorative bow.


I like simple, monochromatic designs and love the look of this sack with matt white flock on the hessian and just a few silver stars to highlight the design. In this post I'll take you through how to make one of these for yourself with designs and fonts from the Silhouette Design Store. There are quite a variety of postmark files in the store, I chose one that I thought complemented the tree design nicely.


WHAT YOU'LL NEED

Hessian Sack
White Flock Heat Transfer Material
Silver Glitter Heat Transfer Material
2" Wide Wired Ribbon
Hair Elastic
Teflon or Silicon Sheet
Iron or Heat Press
Postmark file by Anita McGee (#70631)
Line of Trees file by Echo Park (#14570)
LW Perfect Type font by Lori Whitlock (#55154)
Yellow Daisy font by Rivka Creations (#106927)


STEP 1:  PREPARING THE FILE

Firstly open the files for your postmark and main design in one design window. Measure your sack and arrange and resize the designs to your liking.

TIPS ON SIZING
Don't be tempted to make the design too wide. Once there are presents inside the sack, the surface will be curved, and too large a design or message will be difficult to see or read. I recommend making the total design a little over one half of the width of the sack.

Using the Text functions type 'PLEASE DELIVER TO ...'. I chose the LW Perfect Type font for the lettering as it seemed most similar to the type of the postmark. Write your names in a script font. I used Yellow Daisy font which is favourite, but is a little too delicate for the rough surface. To compensate I made the script wider using the Offset function. I also did this for other text, to make it match the postmark a little better. I also added some silver stars to add a tiny highlight to the design.

Arrange, align and resize the lettering as you'll require it to look on the finished item. Sometimes it is useful to draw out the item, in this case, drawing a box the same size as the sack.


It can also be useful for yourself to take a screen shot at this point for reference later.


TIP: HOW TO TAKE A SCREEN SHOT - It's easy if you're on a desktop or laptop. Mac is Shift, Cmd, 4 then draw a box around it, Enter. For recent Windows versions search for and use the Snipping Tool. Hilary has more detail on this in her Polar Christmas Bear Post.


STEP 2: PREPARING FOR CUTTING

In order to make the most economical use of the heat transfer material I normally move the pieces around to take up the least amount of space. If you haven't used heat transfer material before you might like to leave the pieces in place, and press from one piece, this is easier to handle and align, but wasteful on material. Either way you'll want to put weeding boxes around the shapes. I draw shapes using the rectangle  or ellipse tool and weld the shapes together.  For irregular shapes, like the tree design, I use the polygon drawing tool. As long as you click on the first red dot at the end it will make a complete shape.


Now, and most importantly, group everything and FLIP THE COMPLETE DESIGN! I won't mention the times that I've forgotten!

Group all the Flock elements and select the cut settings for Silhouette Heat Transfer - Flock and adjust the blade to the correct setting. Carry out a test cut if you haven't used the material before. This is one material that I find that I don't need to deviate from the recommended settings (haven't tried it out with the auto-blade yet though, so that may be different).

Once you've cut the flock, group, flip and add a bounding box to the stars. Select cut settings for Glitter Heat Transfer.


STEP 3: CUTTING THE HEAT TRANSFER MATERIAL

Place your material in your Silhouette shiny side down. I always use a mat, but plenty of folks seem to cut HTV without. Weed the cut shapes within the bounding boxes.


If you have arranged your pieces to save space (and not left them to apply on one sheet, in which case you'd just remove the material surrounding the boxes), trim the boxes with scissors, ensuring that no flock remains on the edges.


STEP 4: APPLYING THE HEAT TRANSFER MATERIAL

Line the inside of your sack with a teflon mat, silicon paper, or (as I have done) an old tea-towel (you can just see the design through the fibres).  Use a ruler to work out where to place your design. I start from the bottom and place the lowest part of the design 5" from the bottom of the sack. I measure where the centre of the sack is across the width and match it up with the centre of the design (just fold the design pieces in half to locate their centres).


You can apply the pieces with a heat press or iron. Here I have used an iron to show you that it is entirely possible. The secret to applying HTV to rough surfaces is ... PRESSURE! You need to push down firmly so make sure that you have a good firm base to press on. I use a very thick wooden chopping board, some folks even use the floor (with some heat-proof protection).

Now, as I have a number of different HTV pieces, I apply the first one by pressing with the iron just long enough to make the backing stay in place.  Then I move on to the next piece, using my teflon sheet to protect the earlier pieces. Once they are all on I press each area for 10 seconds or so pressing HARD!


Then I check the corner of one of the pices to see if it has adhered. If not I press for a few seconds longer.


If you are lucky you can pull the backing away with no problem. Even so, do it slowly and carefully as bits that haven't stuck well can stretch and spoil your design.


Smaller pieces can be more problematic. With these I fold the peeled backing back on itself and pull slowly keeping the fingers of my other hand (or a flat tool like a ruler) on the newly revealed part so that neither part lifts from the ironing surface (you don't see my other hand here as I was using it to take the photo)! Stubborn parts might require the help of a fingernail to start them separating from the backing. Just make sure that you don't stretch any of them.


Once all the design is revealed I press again all over the design for a few seconds with the non-stick sheet in place. Finally, remove the tea towel from inside the sack.

EXTRA TIPS (for really stubborn bits)!
For stubborn areas, try to remove any loose fibres from the surface before pressing. Use anything sticky to do this; tape, lint roller or used pieces of carrier sheet should do the job.
If a small piece lifts from the hessian after pressing, carefully pull off any stray fibres from the adhesive surface and re-press.


STEP 5: FINISHING TOUCHES

The hessian sacks that I have used so far this season are flat and do not have a drawstring.  I close my sacks with a hair elastic (conveniently made in hessian colour, presumably to match blond hair). I attach a double bow to the elastic and the sack is complete.


I hope you'll try using HTV on Hessian or Jute, Burlap or cotton canvas. I've seen HTV designs used on bags and lots of home decor items - not just for Christmas!

I can't wait to see what Christmas project the 2nd Day of Christmas will bring. Don't miss it!

Bye for now,

   Profile | My Blog | Pinterest | Twitter | Instagram


DESIGNS USED:


PRODUCTS USED:

Wednesday, 30 November 2016

Embrace Life Sketch Pen tutorial

Embrace Life Sketch Pen tutorial

Hiiiii Caroline here with a layout I created using a simple star shape, sketch pens and the modify tool.

Here is the layout...


This is a super easy technique but packs a punch, plus you get to add a whole bunch of text to highlight your memory.

I started off using this shape from the silhouette studio...


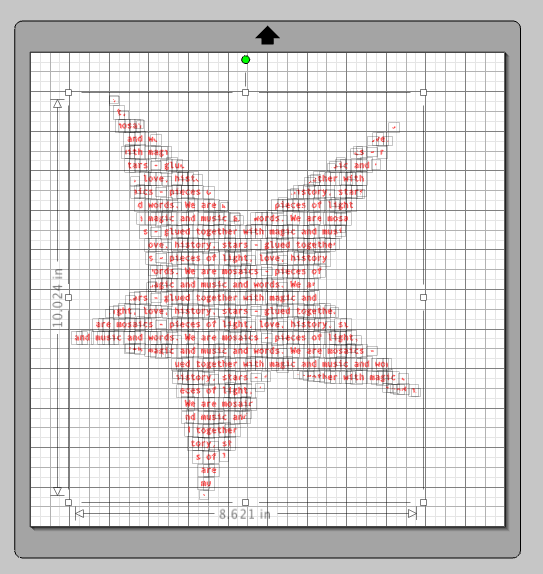
I only wanted to use the top left star so I deleted the other three and then re sized the star to be much larger. Once you have done that, just pop it off to the side.

Now to create your text. I was documenting Freya looking at an amazing statue of a head with mosaic tiles all over it. I decided to have a look on Pinterest for some quotes that would fit the theme and this one stood out to me:

'We are mosaics - pieces of light, love, history, stars - glued together with magic and music and words'

I typed out the quote by clicking the text button on the left. Once clicked a box will appear on the right which allows you to choose the style of font and the size. I wanted to fill the whole page with the text so once I had typed it out I just copied and pasted until it was all filled up....


Now you need to go back to the star shape and drag and drop it over the text...


The next step is to select the whole design and clicking object and group - this is very important!
Now on the top right click the modify tool and options will appear beneath it, click crop and it will look like this...


VERY IMPORTANT - highlight everything as above and again click group, this enables you to resize or move your shape and text about the page as one.

Once that is done you are ready to print your design using the sketch pen setting and you have the background to your page done.

I decided to ad in some stitching in a couple of different coloured threads just to add some texture to the page.

Finally add your photo and embellishments and then sit back and admire your handiwork HA!

Here are some close ups...


I hope you enjoyed this and that you give it a go, I was so chuffed with how this turned out and will be doing it more often on my pages.

I'll be back soon with more pages and ideas.

'Til next time
C x

You can find me here:
Blog
Facebook
Instagram
Pinterest
Twitter

Products Used:

PRODUCTS USED:


Light hold cutting mat for Cameo