Tuesday, 26 April 2016

Challenge :: Free Design of the Week - Ice Cream Cone

Welcome to another Free Design of the Week challenge, I really wish the weather was in-keeping with the design this week!


There is so much that could be done with this great shape and we would love to see what you make with it! Join in the challenge by submitting your design below


Design of the Week - Ice Cream Cone


Hello, Karen here with a scrapbook page using this week's Design of the Week.  When I saw this shape I was instantly reminded of a photo taken of my daughter 21 years ago and the mess she got into eating an ice-cream.

What You Need:-

Silhouette Cameo
White Card
Brown Card
Kraft Card
Cream Card
Red Gem
Silhouette Pens
Pen Holder and Permanent Pen
Water Colour Pencils

STEP 1 - Making your ice-creams. 

  • The first thing I did was to resize the shape to 4.5 ins (11.5cms) and ungroup (Shift +Ctrl+G) it. I mirrored the ice-cream and then cut out the two colours of ice-cream x 2
  • Next I used the release option, under the Modify menu to separate the cone from the diamond shapes on the cone and removed the diamond shapes using Ctrl+X - once you have done this be sure not to  move the cones as your are going to past the diamond shapes back in the the next step.  
 
  • I cut the cone from Kraft card and without removing the mat from my Silhouette swapped the ratchet blade for a brown Silhouette pen . I then pasted back the diamond shapes and deleted the cones

  • I drew the diamonds (remember to change your Silhouette settings from ratchet blade to pen).


 STEP 2 - Drawing the title and borders. 

  •  I am really loving big statement titles at the moment so chose a phrase that would stand out.  I resized this to 9ins (23cms) wide and placed it on my drawing area .  
  • Next I chose two sketch borders - one to go around my page and one to go round my photo. I placed these onto the page and also added the ice-cream cone shapes and a rectangle to represent my photo - I often use my Silhouette software to lay out where I want things on a srapbook page. 
  • Finally I used my favourite sketch font (Georgia Peach Sketch) to write a little bit of journaling on the bottom right of the page. 

  • I deleted the ice-cream cones and rectangle representing my photo and put a permanent pen into a Silhouette pen holder to draw the title and borders.
  • Using water colour pencils I coloured in the title and then added the cut out ice-cream cones and photo.
  • Finally I added a red gem 'cherry' to the top of each ice-cream.
This is such a versatile design and I am really looking forward to seeing what you come up with using it.


DESIGNS USED:


https://www.silhouettedesignstore.com/view-shape/46372https://www.silhouettedesignstore.com/view-shape/71749
https://www.silhouettedesignstore.com/view-shape/92747https://www.silhouettedesignstore.com/view-shape/46375https://www.silhouettedesignstore.com/view-shape/46375


PRODUCTS USED:


Monday, 25 April 2016

Scrapbooking with Double-Sided Adhesive Sheets


Hi there, Niki here again today having a play with the ever-so-fabulous Silhouette Double-Sided Adhesive Sheets. These are basically 8.5x11" sheets of double sided tape, that you can run through your Silhouette.  I choose a shape from the Silhouette Design Store '2 Doilies' and arranged those and a title I made (using Font LW Sunshine) onto my cutting mat. I changed my page setup to be 8.5x11" landscape because that was the size of the Double Sided Adhesive Sheet and I wanted to try and get my whole design on one sheet. I then adjusted my cut settings by selecting 'Double Sided Adhesive Sheets' from the list of materials, and I adjusted my blade to the recommended setting. I then whizzed this through the machine and hey presto, I had some double sided stickers to play with!

I made a mount for one of my words, using the Offset tool and cut that out in white cardstock.

And now the fun part: putting my layout together. I wanted to stretch those gorgeous doilies as far as I could so I cut some in half and positioned them going off the page. Once my doilies were in place I peeled off the top protective layer and sprinkled my glitter on top. I have two of the Silhouette Glitter sets - the Bold Colours and the Essential Colours. The pink is from the Essentials as is the silver. The red is from the Bolds. The light pink on the title is a mix of the pink and silver. I couldn't believe how well the glitter stuck to my designs, I thought the crisp edges would get lost but the super-sparkly Silhouette Glitter is quite fine so the edges definitely aren't a problem as you can see!


I will be using a LOT of these sheets in the future!
Happy scrapping xx


DESIGNS USED:

PRODUCTS USED:


Sunday, 24 April 2016

Millefiori bird house

Ages ago I bought a little mdf bird house from B & M stores, but you know how it is, it sat in my box of "things I intend to do".  Then today I got up to a cloudy morning and thought I need to do something to make me feel more Spring like. So that is how my Bird House of a thousand flowers (millefiori) was born. You may be relieved to know it only has about 100 flowers on it!

EQUIPMENT:
Mdf Bird house such as from The Decopatch Place
Paint brush
Some left over paint e.g. from a tester pot
Card stock
PVA glue
Docrafts glitter glue for decoration
Self sticky pearls
Sticky foam pads
Craft wire or a short piece of chain

1. Paint your house in a base coat. Allow it to dry over about one hour.
2. Cut out approximately 50 small flowers for each side of the roof. I used this file that comes free with a Silhouette Cameo 2, and used the central, six petalled flower, removing the central hole. You can use anything similar.

Attach with glue of your choice. I used PVA glue so I could move the flowers around a little before they set in place.

3. I opened the free Silhouette file ID #77791, ungrouping the shapes and releasing the compound path of the front of their bird house. I cut the front out of copier paper, tried it for size, then gradually changed the position of the holes for the entrance and the perch until I had a piece that fitted perfectly over the front of my mdf house. Once I was happy with it, I cut out a piece of lilac dotty card stock and glued it in place.

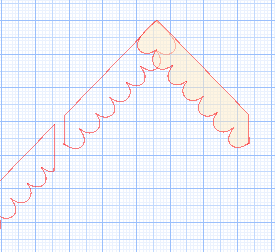
4. I liked the overhang trim of the roof from the free file, so I altered it by using the knife as shown here. I then measured against the slanting side of the house and cut it once more.

5. I replicated a mirror copy and overlapped the two pieces, welding them together. To start with I welded the two scalloped pieces together at an angle of 45 degrees, but once cut out I realised they would fit the mdf better if welded together at an angle slightly less than 45 degrees (see the photo of the finished house). I find Trial and Error is a wonderful tool in your craft box!

6. I made small 2mm circles and took a heart shape from my library. I placed these in position and once I was happy with them, selected them all and made a compound path as shown. 

I filled the roof trim shape with one of my dotty design backgrounds in a toning colour. 

7. The birds were made from Silhouette design ID#1188. I ungrouped the shapes and  made the the eye circle black. Because I was cutting the doves from white card I chose to outline their shape in black. Click on the shape of the bird body, pick black line colour, line style and choose a thickness for the outline. The eye and bird body are regrouped and set to edge cut only. I replicated the wing shape, outlined them, picked background fills for them, and grouped two wings together for the flying birds. They were set to cut edge only. I cut two birds for the adults and then made mirrored images at 75% size for the baby birds. 

8. The birds bodies were all covered in Docrafts glitter glue and allowed to dry. Once the wings were attached, the birds were glued in position, using foam pads for the bird on the perch.
9. To make the sign I used file ID #27839 by Lori Whitlock filling it with a dotty background and adding a Welcome message in white. Two circle holes were added either side. I made two "D" rings by using a suitable letter D and cutting that out. Attach the sign with craft wire or short pieces of chain links. 
10. Self sticky pearls were applied to some of the roof flowers.

This project certainly takes a couple of hours, but I think the effort is worth it don't you? No doubt you will have worked out that you can always take the easy option and simply make the house totally out of card stock using the Silhouette bird house file and decorating that instead! I would love to see any of your bird houses if you chose to make this.


FILES USED:
Flower ID
Bird ID #1188
Bird House ID #77791
Bracket tag ID #27839

PRODUCTS USED:


Light hold cutting mat for Cameo


Saturday, 23 April 2016

Origami Lanterns with Free Cut File

Origami Tutorial Plus Free Silhouette File by Nadine Muir from Silhouette UK Blog


I've always adored origami, but was somewhat intimidated about giving it a shot.  I don't know why I waited so long as it's based on some simple foundations and is incredibly addictive.  I started one weekend and was so totally absorbed that my partner Robbie laughed when he came into the room and I was grinning amist a sea of paper. He grimmanced, "Oh no, Nadine has found another new hobby"!  I knew immediately though, that I could make my designs easily in Silhouette Studio and use my trustee Silhouette Cameo to make all the necessary cuts and scores.

These little lanterns are incredibly versatile.  Here are some suggestions that friends have made on how to use them:
  • Can be used as pretty party decorations and double up as party favours to house some chocolates, sweeties or small toys
  • Add jokes and hang on a twig tree for an evening BBQ
  • String as cute bunting decoration
  • Lit up with fairy lights (make sure to spray with fire retardant)
  • To hold clues for a scavenger hunt.
  • Stacked vertically, they make lovely wedding decorations
  • Use vellum or translucent acetate for garden lanterns
  • Fold flat Christmas tree decorations
  • Scaled up as a bedroom lampshade

What you’ll need: 


STEP ONE: Prepare and Cut the Design

Download the free cut file and open the Silhouette compatible file from within Silhouette Studio.  Cut on the reverse side of your paper.  Red lines are cuts, black are scores.  To score, you can use the blade on a very low setting or a sketch pen.  I used a sketch pen, thickness 33 on double cut.  For thick scrapbook paper, I sent the score lines to the silhouette twice to get a good deep fold line.
Free Origami Lantern Silhouette Cut File by Nadine Muir from Silhouette UK Blog

STEP ONE: Mountain, Valley and Universal folds

I'm sure as kids we've all made accordian fans.  This is the foundation of origami.  A fold towards  you is called a valley fold and one away from you is a mountain fold.  Folding a valley fold then making it into a mountain fold creates a universal fold.

Mountain and Valley Folds from Origami Tutorial using Silhouette Cameo by Nadine Muir from Silhouette UK Blog

Make univerals folds along the parallel running score lines.

Then make mountain folds for all of the centre zig-zag scores.  This should be easy as the back of the paper has already been scored, meaning it'll naturally want to become a mountain fold.  I find the easiest way is to pinch the centre line and create the zig-zag fold my pushing into the point as in the photo below:

V pleat folds from Origami Tutorial using Silhouette Cameo by Nadine Muir from Silhouette UK Blog

Once repeated along the length of the centre folds, you paper should look like this:

V pleat folds from Origami Tutorial using Silhouette Cameo by Nadine Muir from Silhouette UK Blog

STEP Two: V-Pleats

V-Pleats are where the magic happens as they allow the shape to stretch and become 3D.  The angled lines are mountain folds and they allow the parralel lines runing through the V to change from mountain to valley folds.

To create a  V-pleat, bring edges of the V together, as shown below:

V pleat folds from Origami Tutorial using Silhouette Cameo by Nadine Muir from Silhouette UK Blog

If you turn the paper and look from the edge, the first completed V-pleat will look like this:

V pleat folds from Origami Tutorial using Silhouette Cameo by Nadine Muir from Silhouette UK Blog

Starting the first pleat is the hardest part, after that the paper will guide you somewhat automatically.

V pleat folds from Origami Tutorial using Silhouette Cameo by Nadine Muir from Silhouette UK Blog

Once repeated along the length of the zig-zag, the shape will look as below:

Origami Lantern Tutorial using Silhouette Cameo by Nadine Muir from Silhouette UK Blog

The piece can be folded flat - a bonus for storage.

Origami lantern can be folded flat.  Tutorial using Silhouette Cameo by Nadine Muir from Silhouette UK Blog

STEP Three: Thread and Glue

Flatten an edge and apply some doubles-sided tape.

Tape ends of the lantern.  Origami Tutorial using Silhouette Cameo by Nadine Muir from Silhouette UK Blog

I find it easier to thread the ribbon through the holes when the shape is flat, so feed through all holes apart from the two end holes.

Threading the top whilst folded  From Origami Lantern Tutorial using Silhouette Cameo by Nadine Muir from Silhouette UK Blog

Bring the two ends of the paper together, overlapping the last concertina .  Feed the thread through the last two holes into the centre.

Thread into the centre to close Origami Lantern.  Tutorial using Silhouette Cameo by Nadine Muir from Silhouette UK Blog

Closed Lantern.  From Origami Tutorial using Silhouette Cameo by Nadine Muir from Silhouette UK Blog


Finished origami lantern.  FromTutorial using Silhouette Cameo by Nadine Muir from Silhouette UK Blog

DESIGN TWO: Double V-Pleats

For the second design, a rectangular shape that has two sets of zigzag lines, I start by following steps one and two above.

Cut and scored lantern template 2.  From Origami Lantern Tutorial using Silhouette Cameo by Nadine Muir from Silhouette UK Blog

First set of v-pleat folds.  From Origami Lantern Tutorial using Silhouette Cameo by Nadine Muir from Silhouette UK Blog

Repeat on the process on the second zigzag.  The shape should look as below:
Fold pattern for second lantern template. From Origami Lantern Tutorial using Silhouette Cameo by Nadine Muir from Silhouette UK Blog

The shape folds flat as before, but this time in a U-shape.  Repeat the steps to glue and thread the holes as above.

Completed second origami lantern. From Tutorial using Silhouette Cameo by Nadine Muir from Silhouette UK Blog

Both completed origami lanterns.  From Tutorial using Silhouette Cameo by Nadine Muir from Silhouette UK Blog

EXPLORE VARIATIONS

Moving the zigzag line  off-centre will create a pear-shaped lantern.

Making the zigzags wider will make the shape longer, whilst a narrow zigzag will create a fatter lantern.

The lanterns can be made fuller by cutting two strips and taping them together, overlapping by one concertina tab.

Paper is the obvious choice for this project, however I experiemented with folding Silhouette vellum that I printed a pattern onto. It worked well and would be very cute with fairy lights.

THE FINISHED PRODUCT

Origami Lantern gallery.  Tutorial using Silhouette Cameo by Nadine Muir from Silhouette UK Blog

Origami Lantern gallery - pear shape. Tutorial using Silhouette Cameo by Nadine Muir from Silhouette UK Blog

Origami Lantern gallery.  Tutorial using Silhouette Cameo by Nadine Muir from Silhouette UK Blog

Origami Lantern gallery.  Tutorial using Silhouette Cameo by Nadine Muir from Silhouette UK Blog

Origami Lantern gallery.  Tutorial using Silhouette Cameo by Nadine Muir from Silhouette UK Blog

Origami Lantern gallery - printed vellum.  Tutorial using Silhouette Cameo by Nadine Muir from Silhouette UK Blog

Origami Lantern gallery.  Tutorial using Silhouette Cameo by Nadine Muir from Silhouette UK Blog

Origami Lantern gallery.  Tutorial using Silhouette Cameo by Nadine Muir from Silhouette UK Blog

Origami Lantern gallery.  Tutorial using Silhouette Cameo by Nadine Muir from Silhouette UK Blog

Origami Lantern gallery.  Tutorial using Silhouette Cameo by Nadine Muir from Silhouette UK Blog


DESIGNS USED:

Free Silhouette Compatible file

PRODUCTS USED:


Light hold cutting mat for Cameo