

Hi all, Niki here with a little home decor project to share. I've been dabbling in gallery walls for a little while now and this is my third one. I start off by deciding on a few colours and then I simply start collecting different frames and bits and pieces in those colours. It usually takes a few weeks or even a bit longer to collect everything I need as I tend just to mooch around a few high street shops that sell a few bits of home decor. Sometimes I'm lucky in finding something and sometimes I'm not. Once I feel that I've got enough, I start filling the frames and then arrange them to go on the wall.
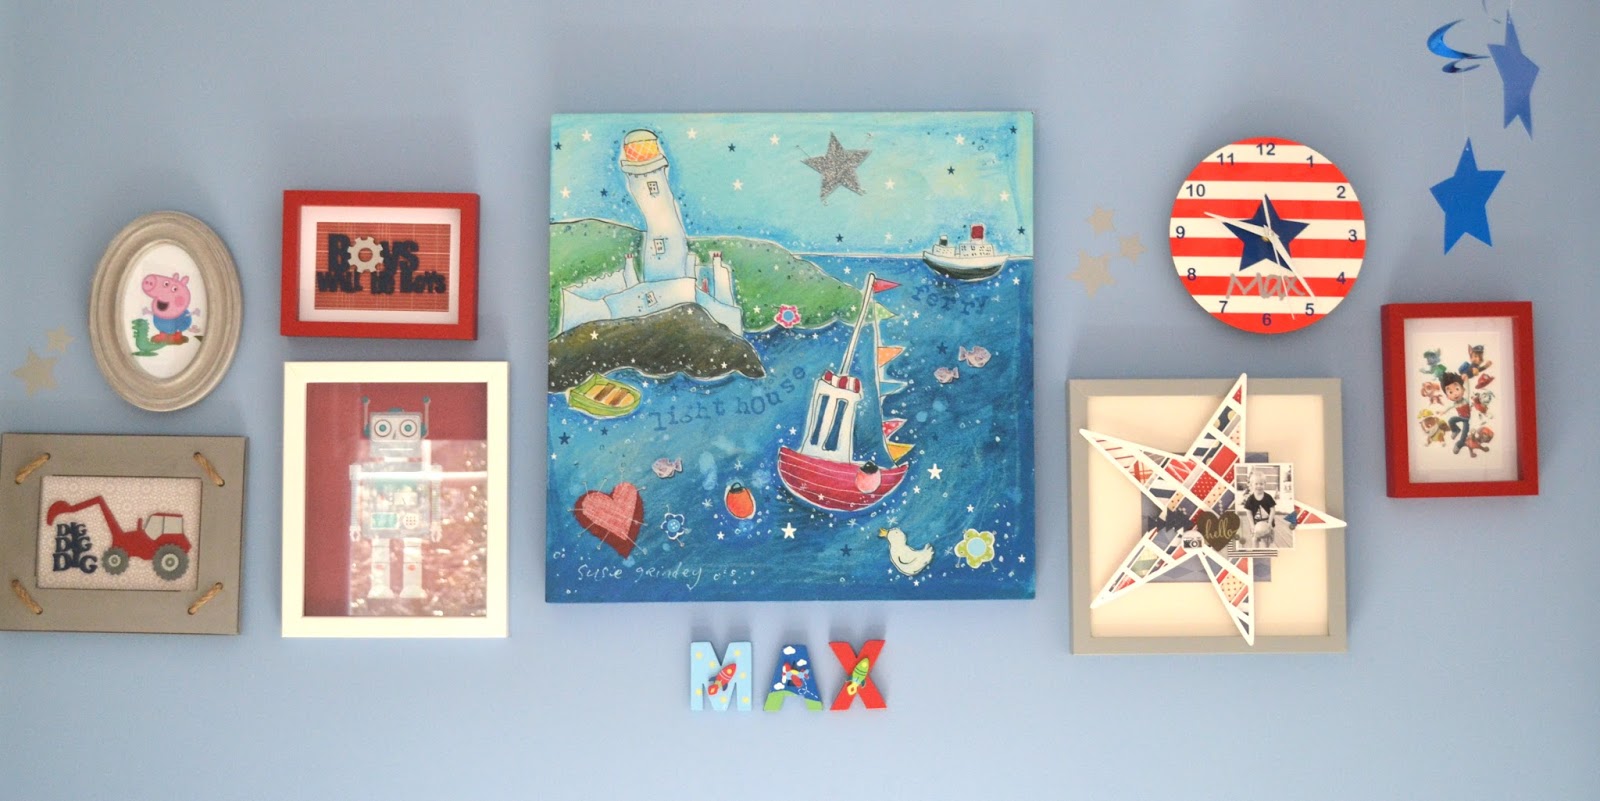
My little boy is nearly three years old and this wall is for his bedroom, which is red, white, blue and grey and there are stars, lots of stars!
I started off with a square plain wood frame that I picked up for £1 because the glass was broken. I discarded the terrible picture that was in it originaly, disposed of the broken glass and painted the frame in grey paint. Whilst doing so I managed to get a splodge on the internal mount that I had planned to use D'oh.
I cut a large Plaid Star out of white cardstock, deliberately bigger than the frame and back-filled it by hand using scraps of patterned papers in the right colours. I then covered the back of the star in foam pads and cut each piece for each gap to size. This sounds like a lot of work but each strip was the same width so I simply cut lots of strips all the same size then snipped them to the required width. There were a few spaces that needed extra trimming but it was quite straight forward actually.
I filled the mount with some blue patterned paper and then layered my back-filled star on top. My idea was that the star would sit on top of the frame, which it does, but it needed supporting in the middle, so I made little towers of foam pads in a few places and it has held in place very well. Unfortunately the small paint splodge on the mount showed no matter where I placed the star, but my motto is 'there's no mistakes, only opportunities' so I simply covered the splodge by adding a photo and a few other embellishments around that area - and no one will ever know it is there!

My next frame to fill was a little less involved. Just a red piece of patterned paper within the mount, and I cut 'Boys will be boys' from blue cardstock. I mainly used textured cardstock in my Silhouette Cameo and for ages I had real problems before I realised there was actually a setting for 'textured cardstock'! I now use this setting, turn my blade up to 6, and always have 'double cut' selected. The gear is cut separately from grey cardstock and is raised up on top of the original cut, with foam pads. The whole phrase is raised on foam pads too and there is no glass in the frame - I like the dimensional look.


This is another frame I picked up in clearance, the back was slightly damaged but as I'll have the front on display rather than the back this didn't cause me any problems. Again I discarded the glass. I really love how it is possible to cut a design like this all in one go, by moving the elements from the design around on the mat, and by placing the different colours of card/paper in the correlating areas. It makes it so easy. Again I have raised up anything I can using foam pads to get that dimension.


And finally I had my first attempt at cutting vinyl. It was way easier than I thought and very easy to apply even though I didn't have any transfer paper. (The scraper tool is brilliant for this by the way.) I have simply cut my little boy's name and added it to his clock. I also cut a few stars in the same vinyl and stuck them directly to the wall in some places.
Here's the finished wall:
Thanks for stopping by, I hope you enjoyed my gallery wall process.
See you next time

Designs used:
Plaid Star #15951
Boys will be Boys Phrase #18151
Boys Dirt Digger Truck #65894
SN@P! Plane, Star, Heart #49312

Products used:


Lovely work Niki!
ReplyDeleteWhat a super gallery wall! The Silhouette pieces really bring it together.
ReplyDelete