I'd like to share with you the method I use to turn flat images into three dimensional objects. After you have done this project the rules can be applied to any shape and there will be no stopping you.
download the free file here.
We will use the image
above as our example. Its a mixture of flat sides and curves, so both
methods can be demonstrated.
 First thing we will do
is move the clock face out of the way as we don't need it at the
moment, so simply click and drag it to one side for now. We are able
to construct the body of the clock from this one shape left on the
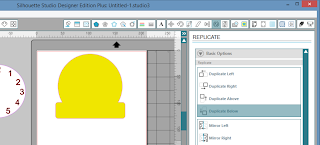
mat. Select the shape and open the replicate window and click mirror below this will give you a front and back for your clock.
Place you selected
cardstock on you cutting mat and load in to your machine. Open the cut settings menu and select the settings for your media type. I used the preset plain card stock settings. Doing a test cut with these proved to be very effective for the card I used. Click the send to silhouette button and allow to cut. Unload you mat and remove all the card from the mat.
I like to give my
projects a little more strength so I like to add in this step, as it
gives the finished project more stability. Using the original image
open the offset options and select internal offset. For my card I
have set the offset to 0.03cm. This measurement is the thickness of your cardstock so you will need to adjust this to match your cardstock. Move the
original image off the mat leaving the new slightly smaller image on the mat. Repeat the replicate steps above to give you two pieces as before.

For these pieces I used silhouette's chipboard and cut with the preset settings for this media.
Now we are going to
make the piece that holds it all together. Applying these principles
to any design will create a smooth edge on your 3D items. Firstly, decide how deep you would like the object to be and then create a
rectangle 29cm long and as wide as you want to make you item, I want
mine to be 3cm. Using the knife snip off an ear from both sides of the
top two corners, this creates a glue tabs to stick each of our
strips together. The angle of these cuts is not important.
Next use the polygon
tool to create a triangle.
Line this triangle up
with the straight edge of your rectangle. Keeping the triangle selected, use the replicate tool to create a row of triangles the same length as your rectangle. Drag a box round all your triangles to
select them and move them so they overlap the rectangle you created.
Select all on you mat and weld them into one piece. Repeat the
triangles down the other side of the rectangle. This strip can be
used for any items you want to make that have a rounded/curved shape,
the greater the curve the narrower you should make your triangles to
maintain a smooth finish.
Your finished strip
will look similar to these strips depending on how small you have
chose to make your triangles.
It is these triangles we will use to glue our pieces together
This is very straight forward to do, make a rectangle the same width as you strip and make it the same length as the straight part on your design. Then simply position this over one of the strips and weld into place.
move everything off the mat and bring in you clock face. With the face still selected use the ungroup function to separate the numbers from the circle. Cut the circle in white cardstock and the numbers in black cardstock or vinyl.
Putting it all together
Now you have all the pieces you need follow the steps to construct your clock.

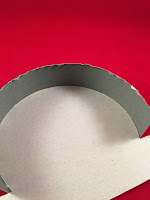
Glue the strip you created to the chipboard as shown. Making sure to follow the contour exactly. There should be no gaps between the pieces when you look from the inside.

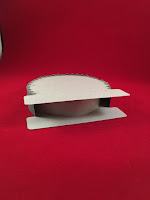
Align the back piece and glue into position. I have used a strip or card cut to size to help support the inside while the glue takes hold. Remove the support when the glue is dry.

shape the next piece and fold up the tabs. Place the piece you have just made into the centre and glue into place.
Apply glue to each face taking care to glue the edges and apply the front and rear pieces. your clock is now ready to add the face of your choice
Here is a link to the complete file for those of you who just want to cut it out and make it. 3D clock download.
Here is a link to the complete file for those of you who just want to cut it out and make it. 3D clock download.
DESIGNS USED
Antique inspired clock hands Design ID #12326Clock button Design ID #50169
PRODUCTS USED
 |  |  |  |  |


Thank you for sharing this tutorial Thelma - there are So many things that will look great in 3D.
ReplyDeleteThank you! Why 29 cm long?
ReplyDeleteThink that it is simply to fit the width of the mat (correct me if I am wrong Thelma)x
DeleteYour right Anne I have kept my measurements to fit A4 so everyone can use them. The strips you are creating will be the base of any project you want to 3D. If you have a Cameo and you need a longer strip then use the full length of you mat. For this project at this size the strip will long enough. Cant wait to see your finished piece.
DeleteGreat tutorial Thelma. I will give that a try x
ReplyDeleteThanks Anne, look forward to seeing your make.
DeleteGreat tutorial Thelma thanks for sharing it
ReplyDeleteGlad you liked it. its good to share!
ReplyDeleteLove your tutorial thank you!
ReplyDeleteThank you for taking time out to read it. Hope we will see some of your creations soon!
ReplyDeleteWow, what a fantastic tutorial! Thanks so much! x
ReplyDeleteThanks Maria.
DeleteFascinating....I love 3d projects...nothing will be safe from now on! Thanks for a great tutorial
ReplyDeleteThis comment has been removed by the author.
DeleteHappy crafting Thedamester!
ReplyDelete