
Hello
Silhouette fans!
Maria here today with my first ever project for Silhouette UK! Since this is my first
ever project, I wanted to go for something simple and that I know well:
personalised paper bunting (well, I say paper, but it is actually made with
good quality cardstock!)


WHAT YOU WILL NEED:
The
colours are up to you and your personal taste, but I will be using:
- Silhouette Cameo®
- 12x12 white cardstock
- 12x12 pink patterned paper
- 5x12 pink cardstock
- 2.5x12 white cardstock
- 2x12 black cardstock (or a smaller piece)
- · Glue, thread/ribbon and any other finishing touches that you may like.
All sizes are approximate, and depending on how big or small you want your project to be! You can also use the Silhouette Portrait if that is the machine that you have... Just adjust your paper size and make sure you fit all your shapes in an A4 page!
Instructions:
Open a new document in your Silhouette Studio and
import the bunting file (design #30802) from your library. I am only going to
use the triangle shape, so I went ahead and ungrouped the shape and deleted the
ones I was not going to use. Resize as required: I want my bunting to be approximately 15cms
tall, so I make sure that I press shift in my keyboard to maintain the
proportions of the object whilst I drag the bottom right corner until I reach
the approximate size I want. I want to make the most use of the space, so I
notice that if I bring the size down just a notch I will be able to fit more
shapes in my 12x12 cardstock.

Now I add some small holes on the top edge of my bunting which will be super useful for threading your ribbon or whatever you are using for putting the bunting together.

This
is going to be the base of my bunting and it will be cut in white cardstock.
Next I create the triangle which will be cut with pattern paper. I copy and
paste the current triangle and then resize it slightly smaller. I now add the scallop shape (Design ID #2213) and also
draw a circle to fit inside the scallop, using the ellipse tool in the left
bar. In order to get a perfect circle make sure you are holding down the shift
key on your keyboard whilst creating it.

So
this is the basic shape of your bunting done! Now the fun begins… Separate each
individual shape and temporarily put it in the grey area of your work space.
Now, one by one, bring each shape into your design mat and duplicate it as many
times as you need! The name I want to use is Laura, which is five letters long,
so I need at least five of every shape! However, I want to make the best of my
cardstock, so I will be cutting 6 or 7 shapes, and keeping one spare just in
case something goes wrong!

For cutting, I actually brought the cirlces, scallop and words into the 12x12 mat as they were all going to be cut with the same settings.
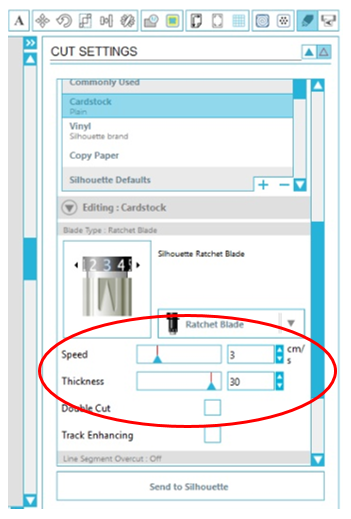
Now it’s time to send to Silhouette and cut! For all the cardstock shapes, I am using the settings for Plain Cardstock, however, I like to make sure that I go slow so I modify the settings slightly as per the screenshot below. Those settings have always worked well for me with 170-200gsm card!
Now, it’s time to cut your word! I am cutting the name Laura in black cardstock. The font I have chosen is design #122249 from the Design Store and it’s absolutely gorgeous!
Lastly,
just be careful to change your settings when it’s time to cut the patterned
paper! The default settings under patterned paper work well for me, so no need
to modify anything.

And those are all the shapes that you need! Once you have cut everything you can assemble your bunting! Feel free to decorate your bunting with other shapes like hearts or butterflies, or anything that you like!
I hope you have found this tutorial useful and it's inspired you to create your own personalised bunting! Read you soon!
PRODUCTS AND DESIGNS USED:


Thanks for reading,
Maria x
Lovely bunting and a very clear and useful tutorial - congratulations and welcome!
ReplyDelete