Hello, Janet here with a quick gift idea. I've designed my own vinyl decal to decorate a plain wooden blank, with some fonts and a bird file from the Silhouette Design Store, using the Silhouette Matte Removable Vinyl. I prefer the matte finish over glossy for more rustic-looking projects. In this post I'll show you how to put your own design together.
What You'll Need
Silhouette Cameo©, Portrait or Curio
Silhouette Matte Removable Vinyl
Silhouette Transfer Tape
Silhouette Studio© Designer Edition
Small Wooden Blank
Chalk Paint
How to design a Decal
1. Firstly bring the shape of your blank into the Silhouette software. You could scan your blank, or use a PixScan™mat with scanner or camera, but I took the low-tech route and just drew it on the screen using the drawing tools in the Silhouette software. It doesn't need to be a perfect replica as long as the size and shape are roughly similar to the blank.
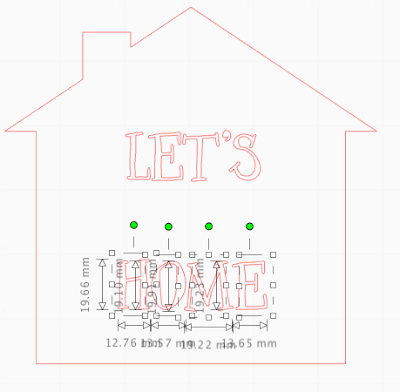
2. Next type in the first piece of text. Click on the Text tool and type "LET'S" and "HOME" in the LW Sketchy font. Select your text and open the Text Style Panel. Adjust the Text Size, Alignment (to Centred), and Line Spacing (to allow roughly enough space for "stay", it can be fine-tuned later).
3. Refine the text. First ungroup the words (right mouse click, select Ungroup). Refine the letters by fine-tuning the spacing and make an external offset if you'd prefer the letters to be a little thicker.
Then regroup the letters, one word at a time. Adjust the spacing between the words if you need more space for "stay".
4. Type the final piece of text. Click on the Text tool and type "stay" in the lovely Willow Bloom font by Skyla Design. This font comes with the swashes, and it is easy to select them using the Glyphs tab in the Text Style panel (available only in Designer Edition and higher versions of the Silhouette Design software). You can either select alternative characters with the swashes attached (as shown), or type the swashes separately and weld them on to the letters (this font comes with both options).
When you are happy with the sizing and letter placement, weld the each entire word together. This gets rid of unnecessary cut lines.
5. Adding the bird design. The bird design is too complex to be cut at this size. Release the compound path and/or ungroup the design until all the elements are separate. Delete the writing and eye from the bird. Adjust the legs and claws if you wish (I removed the legs with the knife tool and added two new legs (just by drawing two thin rectangles and rotating them a little). Overlap the bird's legs with the swash on the letter 'y', select word and bird and weld them together (right mouse click, select Weld).
Prepare the Decal for Cutting
EITHER (1) If you want to save vinyl, and are confident with centring decals, then move the decal to the corner of the mat and draw a small cutting box around it, discarding the house outline.
OR (2) For easy placement, leave the house outline in place and draw a box around it, then locate all the pieces to a corner keeping all the pieces in the same relative positions (as shown below).
Cutting and Applying the Vinyl
Cut the vinyl with or without a cutting mat (using a mat is easier if your vinyl is less than 12" wide) using the 'Vinyl, Matte' default cut setting as a guide. After carrying out a test cut, reducing the force to the point at which it will just cut through the top layer of vinyl will reduce wear and tear on your mat. I usually use Blade 1, Force 9, as shown below. Your ideal setting may differ depending on the state of your blade and mat.
Weed the unwanted pieces of vinyl away. If you cut out the house shape, just remove that and the inside of the letters. Lift the vinyl from it's backing sheet using transfer tape and align it onto your painted blank. Burnish it well with a flat edge and then carefully peel the transfer tape away.
There you have it, just add a hanging loop and your gift is complete.
This is a great first project if you haven't tried vinyl before.
Bye for now,
DESIGNS USED:

|

|

|
PRODUCTS USED:

|

|

|

|


Super project Janet.
ReplyDeleteFaith
Thank you Faith, I'm glad you like it.
ReplyDelete