

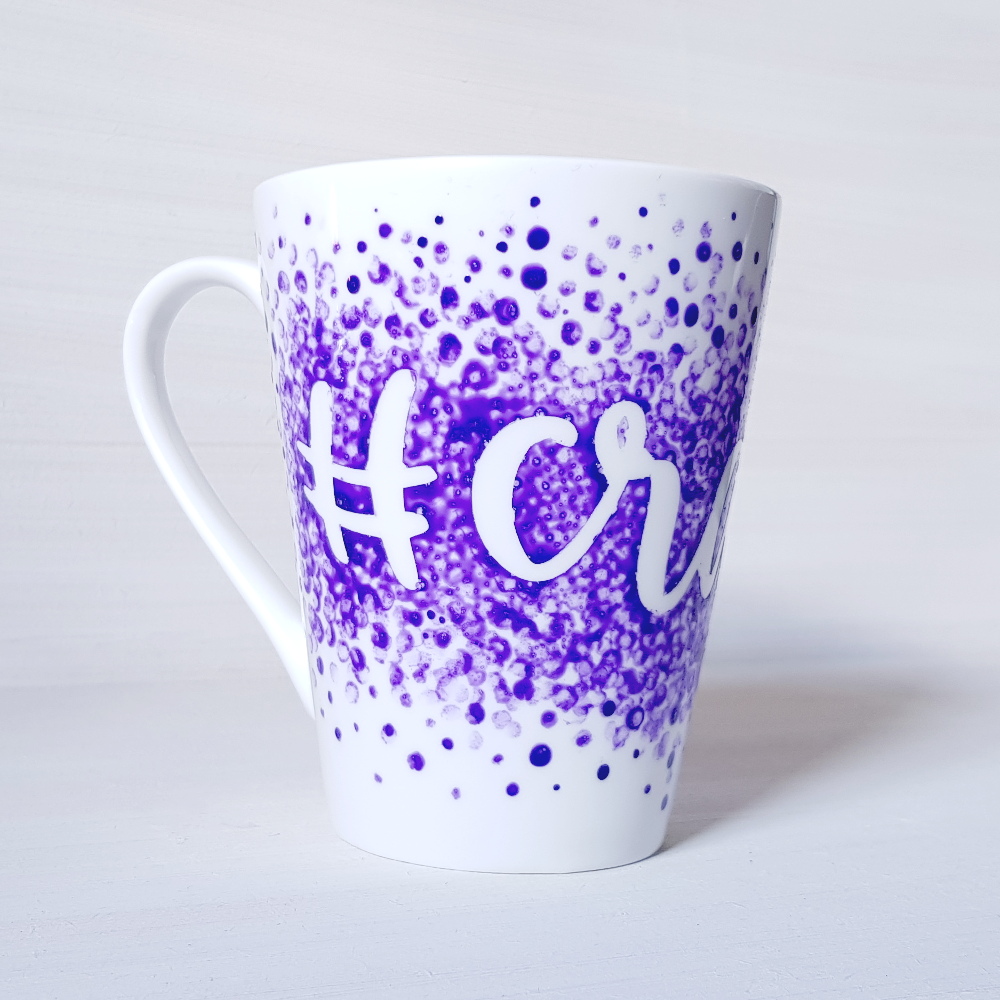
Hello, it's Verity here from Pretty Little Button. A few weeks ago, I went to the Creative Craft Show at the NEC. Whilst I was there I won a mug making kit which included two mugs along with porcelain paint. As they were blank mugs, I thought they were perfect for adding a 'Silhouette' touch to them. Adhesive vinyl can act as great stencil material on surfaces like this, and as long as you don't use permanent adhesive vinyl you can easily create a positive paint effect like this.
Dotty stencilled painted cup process:
For this cup, I went with a simple design using '#crafter'. Change the font style to a font of your choosing; I used 'Sweet Mia' from the Silhouette store.

Next, you need to make sure all your letters in the design is welded together. With the text selected, right click and select weld.

If you have more than one word, then these will not weld together, for example like the # in my design, you need to group all of the parts together to adjust the size of your design. Right-click again with all the elements selected and click group.

To adjust the size of the design, use the object size options in the top toolbar. Make sure the little padlock appears closed as this will adjust your design proportionally and if you change the width, it automatically changes the height proportionally.

To use the arp feature, you need a designer edition of the studio software or higher. The icon that appears warped in the right-hand toolbar opens up the warp window.

There are two tabs to the warp feature, the second tab has template warp shapes - allowing you to take out the guesswork for you. Select the shape most appropriate one for your object.

When it applies the warp, you will notice additional adjustments lines around the design (in green, blue and grey).

For a bit warp fit, you can adjust these to suit your object. My cup gets thinner as it gets near the bottom. Therefore adjusting the bottom right square allows me to move the bottom of the design in and thinner in width.

Remember to do this the same on the other side for symmetrical warp.

When you are happy with the warp, you are ready to send your design to cut.

For the cup, I wanted the word to be left bare for the cup but the dotted paint to appear around the words to negative dotted design. Therefore, I weeded all the negative vinyl to leave a positive design on the back sheet. Use transfer paper to adhere the vinyl to your object.

To apply the porcelain paint, I used a cotton bud and varied the pressure and size of the dots. However, you could use any shape to apply the paint.

This was left to dry for 24 hours before removing the vinyl from the cup. To heat set the paint, the cup was baked at 150C for 35 mins to set the paint.


Until next time,
Verity

Profile | Pretty Little Button Blog | Instagram | Facebook
FONTS USED:
PRODUCTS USED:


No comments:
Post a Comment