

Today I am going to show you how to make a mat for the front of a card so that:
- some of the letters are cut out like a stencil to show pattern or colour on the card below
- some of the letters are printed on the mat
- some letters are cut out and layered on top of the mat with foam stickies
This technique takes a fair bit of time, and there is a little bit of skill in deciding what sort of font works for each layer, but the end result looks really effective. At the end of the post I will show you some more complicated messages I have done in the past, to inspire you, but for the tutorial, I have chosen the word "Peace" as it short and so universally appropriate.
EQUIPMENT:
Silhouette Cameo or Portrait and a colour printer
Metallic Silhouette pens
Card
Holographic card
Silhouette glitter
Silhouette double adhesive
Background fills of your choice
Various fonts of your choice
Sketch flower corner by Jennifer Wambach #13945
Dove of Peace by Sophie Gallo #67449
The Initial Design
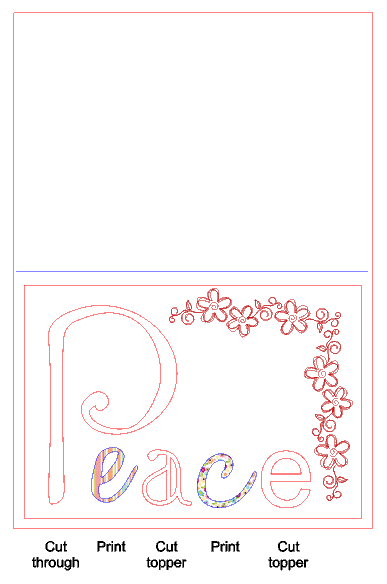
As I use C6 envelopes I have a card shape saved in my library that I use all the time. The blue line is not cut and serves to show me where the fold will be. I draw a mat for the words, a little smaller than the front of the card. I have added a border of flowers to be drawn with sketch pens.
Go to the Text tool and type each letter separately, as you are going to make each letter in a different font and will need to be able to change the size and position of each letter. As shown above, I decide which letters will be cut out like a stencil, which will be printed on the mat, and which will be cut as toppers.
EQUIPMENT:
Silhouette Cameo or Portrait and a colour printer
Metallic Silhouette pens
Card
Holographic card
Silhouette glitter
Silhouette double adhesive
Background fills of your choice
Various fonts of your choice
Sketch flower corner by Jennifer Wambach #13945
Dove of Peace by Sophie Gallo #67449
The Initial Design
 |
| Image 1 |
Go to the Text tool and type each letter separately, as you are going to make each letter in a different font and will need to be able to change the size and position of each letter. As shown above, I decide which letters will be cut out like a stencil, which will be printed on the mat, and which will be cut as toppers.
STEPS:
Stencil cut out letters
It is easiest if you cut out letters that have no middle bits to fall out e.g. capital E, but not small e. Select a letter and try out various font styles with the letter. For my capital "P" the font I chose worked well as a Cut out since the middle of the P would still be attached to the mat after cutting.
Printed letters
You can use narrow fonts for this, even script fonts, but as I want each letter to have roughly the same weight, in the example above I chose fonts that would look good with a pattern or colour fill. You need to think how the colours will work together and which colour is lying next to which other colour. It is very important to ensure that whilst the stencil letters are set with a cut outline, the letters you want to print must be set to NO CUT! When I make something No cut I habitually change the outline line to blue to remind me.(see above).
Letters being cut to be supported on the top layer with foam pieces
The edges must be set to Cut. Rather than filling the letters with pattern, I print rectangles of pattern with the letters being cut out of these. It just means that if the cuts are very slightly "off" they will not have a white line around them. On the other hand, you can cut them from printed card that you have in your stash! Below, I show you my A4 cardstock ready to be printed. Registration marks are switched on to be printed (not shown)
Once printed, place the card onto a Silhouette mat and feed into the machine.
 Sketching the border
Now, because I want to use sketch pens, I select absolutely everything EXCEPT the flower border and move those pieces off the design area. This means that I can now select Sketch pens within the software, pop a pen into the Cameo holder and send the design from my computer to the Cameo. If I didn't do this, all cut lines in the design would be drawn by the pens. For my final design I used a metallic green pen.
Once the sketch is done, take out the pen and replace the blade in the holder. On your computer, hit Undo from the top menu bar until all elements are in place again. Now remove the flower border as it has been completed, and if you leave the flowers in place at the next step, the Cameo will try to cut them, which you don't want!
Adjust the cut settings on your computer to cut your card, adjust the blade depth if needed, and click on Send to Silhouette. Now you should have all the card pieces needed to put the card together.
ASSEMBLY:
I made a card base in teal and glued some holographic silver card to it to lie behind the "P". As you will see from my final photo, I also added glitter to my dove, the small "a" and the small "e". To do this I used Silhouette double sided adhesive paper and cut the shapes from it, attached them to the pieces just listed and shook on various Silhouette glitters. Until I became a Design Team member I hardly used glitter, but now I use it in almost every project I love it so much!
The white card mat is supported and adhered to the teal card with foam pads. The glittered elements are also attached with foam pads, and the final touch was to add some diamante embellishments to the centre of the flowers. If you look back at Image 1, you will see I changed my mind about what font to use for the small "a" as my first choice would have been difficult to attach with foam.
Here is the final card to show you its depth and below it you can see some other cards I made in the past that are more complicated, but use the same technique. I think they are pretty special. I hope you do too!


PRODUCTS USED:
The edges must be set to Cut. Rather than filling the letters with pattern, I print rectangles of pattern with the letters being cut out of these. It just means that if the cuts are very slightly "off" they will not have a white line around them. On the other hand, you can cut them from printed card that you have in your stash! Below, I show you my A4 cardstock ready to be printed. Registration marks are switched on to be printed (not shown)
Once printed, place the card onto a Silhouette mat and feed into the machine.

Now, because I want to use sketch pens, I select absolutely everything EXCEPT the flower border and move those pieces off the design area. This means that I can now select Sketch pens within the software, pop a pen into the Cameo holder and send the design from my computer to the Cameo. If I didn't do this, all cut lines in the design would be drawn by the pens. For my final design I used a metallic green pen.
Once the sketch is done, take out the pen and replace the blade in the holder. On your computer, hit Undo from the top menu bar until all elements are in place again. Now remove the flower border as it has been completed, and if you leave the flowers in place at the next step, the Cameo will try to cut them, which you don't want!
Adjust the cut settings on your computer to cut your card, adjust the blade depth if needed, and click on Send to Silhouette. Now you should have all the card pieces needed to put the card together.
ASSEMBLY:
I made a card base in teal and glued some holographic silver card to it to lie behind the "P". As you will see from my final photo, I also added glitter to my dove, the small "a" and the small "e". To do this I used Silhouette double sided adhesive paper and cut the shapes from it, attached them to the pieces just listed and shook on various Silhouette glitters. Until I became a Design Team member I hardly used glitter, but now I use it in almost every project I love it so much!
The white card mat is supported and adhered to the teal card with foam pads. The glittered elements are also attached with foam pads, and the final touch was to add some diamante embellishments to the centre of the flowers. If you look back at Image 1, you will see I changed my mind about what font to use for the small "a" as my first choice would have been difficult to attach with foam.
Here is the final card to show you its depth and below it you can see some other cards I made in the past that are more complicated, but use the same technique. I think they are pretty special. I hope you do too!


PRODUCTS USED:
 |  |
No comments:
Post a Comment