Sunday, 22 April 2018

Sunday's with Steph - One cut file two ways - part 2!


Hello - and welcome to this weeks post!

As promised I have the second part of the one cut file two ways to show you!  Like last week I used the spooky starts cut file which can be found here: https://www.silhouettedesignstore.com/designs?search=spooky+stars&sortby=relevance&submitted_search=true This time however, instead of using the same cut function as before I used the small slit function that can be found on a drop down on the left hand side of your design page, third choice down.


I sent the design to cut.  I used heavyweight card stock the same as before and the machine quickly done as it was asked.  Then I had the enjoyable but laborious task of sewing round all of those stars!

I used both regular and metallic embroidery thread in different whites and greys and ploughed on through it - I didn't time myself but it did take quite a while but I was really pleased with the end result.


Once I had finished sewing I took half an inch off of each side and then placed it onto some star paper that I had gutted in the middle.

The rest of the layout came together really quickly using a black and white photo, which I placed onto some turquoise coordinating card, added journaling, some other bits of card, an acrylic title and some enamel dots and I was done!

Enjoy your week - Happy scrapping!

Steph xx


Saturday, 21 April 2018

Faux Cross Stitch using Sketch Pens


Hello, hello - Karen here with a little idea I had for using my Silhouette and sketch pens to make a faux cross stitch pattern.

The pattern I chose took quite a while to make but it could be used to a lesser degree to make a card or just a smaller pattern on a layout.

There are many free cross stitch patterns on the internet and DMC have a great range - this is where I got my one.

I chose one that was deemed to be a quick project.  It did in fact take me about 90 minutes to set it all out but well worth the time as I now have a lovely design saved for future projects.

The first thing I did was to change the grid on my design space to 1 inch spacing and 10 divisions.


Next I downloaded my chosen pattern and opened it.  Because it is a pdf file you will get a screen like this one.


After resizing the pattern to match the size of the grid on my page I zoomed in and started to do my 'cross stitch'.  Using Apple Pie Sketch font I drew a 'x', zoomed in and used the square 'handles' to stretch it to exactly fit one square.


Now for the fun part - colouring the squares and 'cross stitching' your pattern.  Use the line style pallet to choose the colour and also increse the line thickness to 1 point to make it easier to see.  I found using the replicate panel made it quicker to make my pattern and once a 'stitch or stitches' were replicated I could quickly place them where I wanted. 


I didn't copy the whole pattern just a segment and then altered it to my liking.


Once I was happy I replicated it, adjusting the angle as necessary, to give me a cross stitch wreath. 


To draw it with my sketch pens I chose the line option on the send screen and drew my colours two at a time. 


It was such fun watching my machine cross stitch this pattern for me and I am really pleased with the results.


Friday, 20 April 2018

Believe | Doodling with Sketch Pens | Niki Rowland


Hey there! Niki here today. OK, I'm aware I'm a bit late in the year with Christmas layouts but I had some photos leftover from Christmas time that I hadn't scrapped yet and just decided to get them done this month! (I also have loads of Halloween photos but that's another story...)

So for this layout I've used my sketch pens. I love sketch pens - they are great for so many things but I usually use them for giving cut files some definition rather than actually drawing with them. So today I have used three doodle-style cut files to doodle directly onto a layout - absolutely no cutting involved whatsoever!

I love these doodled decorations - they are a border and are specifically a sketch pen file. This one comes with a doodled design PLUS an outline for cutting. I choose to doodle directly onto my background so didn't need the cut so I separated the two designs and removed the cut outline. I re-sized and positioned the design onto my layout.

I then opened up some frames - again these came with cuts too but I separated the doodle parts I wanted and deleted the rest.

Again I re-sized and positioned these frames onto my layout. I can actually see my layout coming together on screen which is pretty cool.

And then I decided I needed something at the bottom too. I found some word borders, deleted the cuts and selected the one that I wanted.

 I positioned this word border onto my layout at the bottom and made sure I had everything in the right place before sending to sketch with my Silhouette.

 In the 'Send' screen I selected 'sketch' from the dropdown menu on Tool 1 and I took out my blade from the actual machine and popped in a black sketch pen. I then sent it to sketch.

I find watching the sketch pens doing their thing in the machine really quite fascinating - the quality is awesome! I loved the hanging decorations at the top so much! I coloured them in using water colour paints and a fine paintbrish and embellished with enamel dots, gems and fussy cut presents and ephemera.

I added photos and papers in each of the frames and created little clusters of embellishments around them. I also hand wrote my journaling under the doodled word border at the bottom.


Will you give your sketch pens a work out? I really enjoyed using mine in this way and the effect is really awesome and such a high quality finish. I must do it again soon!

Happy scrapping xx 


DESIGNS USED:

PRODUCTS USED:


Thursday, 19 April 2018

Sketch pens and cut files

Hi and welcome to my Thursday post!

This week I have been playing with silhouette sketch pens...I have various colours but had never used them (shocking I know!) 

I decided against just writing journalling on this occasion and instead went about using them with cut files. Somewhere in the dim and distant past I am sure Paige Taylor Evans did this and I had always wanted to give it a go.

The first cut file I chose was ...

Flower Background by Paige I decided to sketch this cutfile by simply following the instructions on the Silhouette Cameo ie changing out the blade for a Silhouette Sketch pen (I chose grey) and changing the settings to sketch rather than cut.

Next I ungrouped the file and took a single petal and duplicated it 132 times. I used some gorgeous pink ombre paper to cut them from. I glued each petal in place on the sketched page keeping the ombre effect.


I added a photo, title and embellishments (mainly owls as still being inspired by the random challenge)


and the layout was complete...


I loved this technique so decided to do the same again using the Geometric Fox cutfile
This time I drew the outline with a browny orange Silhouette Pen then cut all the pieces in a coordinating piece of patterned orange paper. This time they were attached with foam pads... 


giving a little more texture and detail...


Finishing the page with the photo and some fox themed ephemera (yep another random challenge completed!)


In these 2 pages the cut file definitely dominates the page, which can sometimes seem a bit overwhelming. Neither of my photos were particularly good but I still wanted to document the stories, so using big beautiful cut files draws the eye away from the photo (not usually what I want to achieve!) but adds to my page and makes it much more visually pleasing.

I would love to know how you use cutfiles and not so good photos! Please share links to any of your work as we would love to see them.

Have a great week

Ruth xxx

Wednesday, 18 April 2018

Design of the Week - 17th April - Fire Engine


Hello, hello - Karen here with a little card featuring this week's design of the week which is a fire engine.


I love how sometimes things fall into place and this design is a good example of this.  I am taking the Rainbow Pack to visit our local fire station in a few weeks time and what better design to use for a thank you card than this lovely little fire engine.

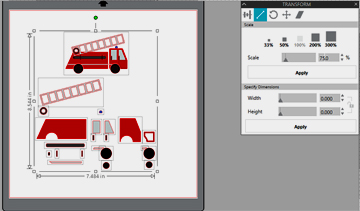
I opened the file, which is both a cut file and a print and cut file, resized it to 75%


 and separated the colours into sections on my design space.


I then added pieces of card in the relevant colours to my mat.


Cut out the shapes.

Put a pre-cut card blank onto my mat and worked out where I wanted the sentiment and used a sketch pen to write 'Thank You'.

All that was left to do was to use the print and cut fire engine as guidance and assemble my card.

I now have a fabulously appropriate card for the girls to sign - the only problem will be remembering where I have put it nearer the time.:0)