Tuesday, 13 December 2016

Sketch Penguin


Hello, hello - Karen here with the first of our ways to use the awesome Nic Squirrell's penguin file.

It's no secret that of all the facilities afforded to us by our lovely Silhouettes my absolutely favourite is using sketch pens.  So I decided that I would make the penguin file into a sketch border to complement some photos that I took of my daughter posing with the penguins at the Zoo.


You will need:-
Silhouette Cameo
Sketch Pens or Pen Holder

Making Your Sketch Penguin

  • I opened the file and selected the sections I wanted and deleted the rest. 
  • Next, drastic as it sounds, I used the knife (set to solid line) to remove his feet!


  • I then used the eraser to remove the line at the top of his feet 

  • and moved them back into position.


  • The next thing to do is to use the knife to separate his beak from his head, this time use the outline setting.

  • I then moved the beak back towards the head, there will be a slight gap either side but once the border is made this will not show. 
  • Release the sections of the drawing (under the modify window) and colour them orange and black appropriately.  Group all the parts together. 

You can now use your sketch as you wish.  I decided to use mine as a border around my page.  I mirrored my penguin and then duplicated it around the page.  Then I deleted all the beaks and feet and drew the black, removed the black replaced the orange and drew that. 

I think you will agree that this cute little penguin makes a fabulous border and I can't wait to see what our other brilliantly talented DT have done with him!


DESIGNS USED:

PRODUCTS USED:

Monday, 12 December 2016

UK Designer Spotlight - Nic Squirrell & Exclusive FREE Penguin Design


Hi Lisa here, to round up our 12 days of Christmas we have a great little treat for you!
The design team have brought some fantastic Christmas project and lots of lovely freebies too - they do an amazing job and we are so lucky that they are part of Silhouette UK, but today they get a day off so I can bring you a fab freebie on the blog and also launch some fab competitions on our social media platforms so keep your eyes on those today!

While Silhouette America and their designers do a fab job, we really like to champion our UK Talent so today is all about one of our favourite UK Designers, the lovely Nic Squirrell, not only does she have an awesome name, she designs some awesome stuff too!! She is a real favourite with myself and our Design Team and they were super excited when I told them we were going to do a little feature on her, so that is enough waffle from me, here is what Nic had to say when I asked her to tell us a bit ore about herself

Hello, I'm Nic and I am one of Silhouette's artists.

I live in a village in Kent, England, with my husband, our daughter, and three cats who think they are my studio assistants, although it has to be said, they are a bit rubbish.
 I studied Creative Visual Art & 3D Design at the University of Greenwich.  We painted, printed and sculpted, used metal and clay and glass and textiles and made a lovely mess.  It was great fun, and taught me to think in 3 dimensions, which is particularly handy when designing for Silhouette.

I love to draw and paint in all sorts of media, and am most inspired by nature and organic shapes.
I lived in Japan as a child, and it has been a big influence on my approach to design.
I get lots of ideas while going for early morning walks or runs in the countryside near my house.
My work is licensed worldwide as wall art as well as all sorts of products from greetings cards to luggage and everything in between.

I love designing papercut files for Silhouette, it's like a puzzle to work out how it’s all going to fit together.  Watching a design being cut and coming to life is like magic, I never get tired of it.  I really enjoy seeing what people make with my Silhouette files.
Instagram: @nicsquirrell
twitter @nicsquirrell

Nic has also been really kind and designed an exclusive shape for the Silhouette UK Blog, it is this super cute penguin file which you can download from HERE 

The Design Team were so excited about the free file that they have all made a project with it, so the next 7 days will be filled with penguin inspiration too!! 

As I mentioned earlier, we have some more giveaways launching today, so keep your eyes o the newsletter (you can subscribe over on the right of this page) and our Facebook and Instagram accounts for more info!

If you do make anything with your penguin file, please do tag us so we can see what you have done and share it with Nic too


Sunday, 11 December 2016

Sliceform Snow Globe with FREE Cut File - 11th Day of Christmas

Video tutorial and free sliceform snow globe cut file for Silhouette by Nadine Muir

Nadine here with a free snow globe sliceform that can be used as decorations or within a pop up card.  Just like the sliceform Christmas trees that I shared with you on Friday, they fold flat for postage or storage and need no glue.  There is a little loop for you to attach any shape inside, whether flat, such as the bird, or 3D such as the mini sliceform tree.


What you’ll need

  • Silhouette
  • Free Cut File –Download here
  • Card / Paper / Acetate

I made a video to show you how these globes are constructed.  The process is very simple and you can construct these in any order you prefer, so the video just shows the way I find easiest.  I've also typed up some notes with the steps if you'd rather skip straight to making - I coloured the slices for ease of reference.


STEP ONE: Start At The Centre with A and E

Slide the two largest stapes, A (red) and E (light blue) together through their middle slots.

STEP TWO: Next Shapes F

Now slide the middle notch on F (dark blue) through the notch immediately left of the centre notch of A(red).  Repeat  on the opposite side for the second shape F.  At this stage, you should have 3 slices going one way and one slice going the other - that's shapes F, then E, then F going through shape A.


STEP THREE: Then Shapes B

Slide shape B (orange) over the three discs F,E,F and notch into it's centre three slots.  Repeat this left and right of shape A (red) so that we have three discs in both directions.


STEP Four: Add Shapes G

Now add the inner discs shape G (purple) into the middle three slots of of shapes B,A,B. You might need to curve the paper to get the disc inside.


STEP Five: Complete in inside discs with Shape H

Complete the row of inside discs by adding the smallest shape H (pink) to either end.  Slot the centre notch into shape A(red) and then slide the discs through the long and thin single slot in shape B(orange).


STEP Six: Add Shapes C

Now you're on the home straight!  Shapes C (yellow) just pop over completed row off inner discs so that's discs H,G,F,E,F,G,H.  You'll notice that shapes H have a slightly longer slot on one end -hook that one on first as it gives you the extra wiggle room to get the slot at the other end into position.


STEP Seven: Add Shapes D

Finally add shapes D (green), again hook the longer slot on G (purple) into the slot first.


FINISHED PRODUCT

Spinning sliceform snow globe.  Free cut file and tutorial by Nadine Muir for Silhouette UK

Front view of sliceform snow globe.  Free cut file and tutorial by Nadine Muir for Silhouette UK

Corner view of sliceform snow globe.  Free cut file and tutorial by Nadine Muir for Silhouette UK

Flattened sliceform snow globe.  Free cut file and tutorial by Nadine Muir for Silhouette UK

Small Sliceform Christmas tree inside acetate snow globe.  Free cut file and tutorial by Nadine Muir for Silhouette UK


DESIGNS USED:


PRODUCTS USED:

Light hold cutting mat for Cameo

Saturday, 10 December 2016

Peace card using triple layered fonts


Triple layered Peace card by Hilary Milne for Silhouette Design UK

Today I am going to show you how to make a mat for the front of a card so that:
  1. some of the letters are cut out like a stencil to show pattern or colour on the card below
  2. some of the letters are printed on the mat
  3. some letters are cut out and layered on top of the mat with foam stickies
This technique takes a fair bit of time, and there is a little bit of skill in deciding what sort of font works for each layer, but the end result looks really effective. At the end of the post I will show you some more complicated messages I have done in the past, to inspire you, but for the tutorial, I have chosen the word "Peace" as it short and so universally appropriate.

EQUIPMENT:
Silhouette Cameo or Portrait and a colour printer
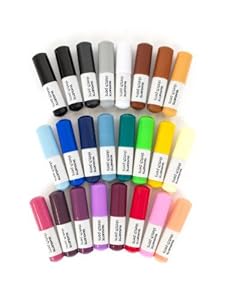
Metallic Silhouette pens
Card
Holographic card
Silhouette glitter
Silhouette double adhesive
Background fills of your choice
Various fonts of your choice
Sketch flower corner by Jennifer Wambach #13945
Dove of Peace by Sophie Gallo #67449

The Initial Design

Image 1
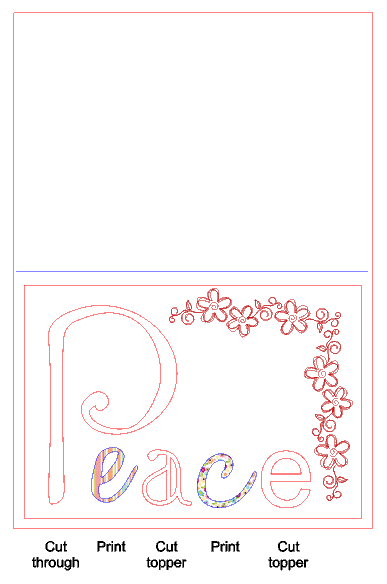
As I use C6 envelopes I have a card shape saved in my library that I use all the time. The blue line is not cut and serves to show me where the fold will be. I draw a mat for the words, a little smaller than the front of the card. I have added a border of flowers to be drawn with sketch pens.

Go to the Text tool and type each letter separately, as you are going to make each letter in a different font and will need to be able to change the size and position of each letter. As shown above, I decide which letters will be cut out like a stencil, which will be printed on the mat, and which will be cut as toppers.

STEPS:
Stencil cut out letters
It is easiest if you cut out letters that have no middle bits to fall out e.g. capital E, but not small e. Select a letter and try out various font styles with the letter. For my capital "P" the font I chose worked well as a Cut out since the middle of the P would still be attached to the mat after cutting.

Printed letters
You can use narrow fonts for this, even script fonts, but as I want each letter to have roughly the same weight, in the example above I chose fonts that would look good with a pattern or colour fill. You need to think how the colours will work together and which colour is lying next to which other colour. It is very important to ensure that whilst the stencil letters are set with a cut outline, the letters you want to print must be set to NO CUT! When I make something No cut I habitually change the outline line to blue to remind me.(see above).

Letters being cut to be supported on the top layer with foam pieces
The edges must be set to Cut. Rather than filling the letters with pattern, I print rectangles of pattern with the letters being cut out of these. It just means that if the cuts are very slightly "off" they will not have a white line around them. On the other hand, you can cut them from printed card that you have in your stash! Below, I show you my A4 cardstock ready to be printed. Registration marks are switched on to be printed (not shown)

Once printed, place the card onto a Silhouette mat and feed into the machine.


Sketching the border
Now, because I want to use sketch pens, I select absolutely everything EXCEPT the flower border and move those pieces off the design area. This means that I can now select Sketch pens within the software, pop a pen into the Cameo holder and send the design from my computer to the Cameo. If I didn't do this, all cut lines in the design would be drawn by the pens. For my final design I used a metallic green pen.

Once the sketch is done, take out the pen and replace the blade in the holder. On your computer, hit Undo from the top menu bar until all elements are in place again. Now remove the flower border as it has been completed, and if you leave the flowers in place at the next step, the Cameo will try to cut them, which you don't want!

Adjust the cut settings on your computer to cut your card, adjust the blade depth if needed, and click on Send to Silhouette. Now you should have all the card pieces needed to put the card together.

ASSEMBLY:
I made a card base in teal and glued some holographic silver card to it to lie behind the "P". As you will see from my final photo, I also added glitter to my dove, the small "a" and the small "e". To do this I used Silhouette double sided adhesive paper and cut the shapes from it, attached them to the pieces just listed and shook on various Silhouette glitters. Until I became a Design Team member I hardly used glitter, but now I use it in almost every project I love it so much!

The white card mat is supported and adhered to the teal card with foam pads. The glittered elements are also attached with foam pads, and the final touch was to add some diamante embellishments to the centre of the flowers. If you look back at Image 1, you will see I changed my mind about what font to use for the small "a" as my first choice would have been difficult to attach with foam.

Here is the final card to show you its depth and below it you can see some other cards I made in the past that are more complicated, but use the same technique. I think they are pretty special. I hope you do too!


PRODUCTS USED:


Friday, 9 December 2016

Snow Globe Shaker Card


Hello, Karen here with another idea for our 12 Days of Christmas.  Hope you love what the team has made so far - I certainly do.

We all have someone who we like to send a special card and today I have an idea for a snow globe shaker card for that special someone .

You will need:-

Cameo
White 12 x 12 card
Black A4 card
A piece of acetate
Black sketch pen
A piece of black and white baker's twine
White beads.


Step One - Sketch Pen Elements


  • Open the snowflake background file and resize it to 5.75 square and remove the outer square.

  • Remove the sketch Merry Christmas from the sketch Christmas Card and give it an .05 offset. Add this to the bottom of the 12 x 12 card that you have your snowflake pattern on. 
  • Use ctrl x to remove the offset section of the sentiment and your sketch pen file is now ready to draw.
  • Do not remove your cutting mat from the Silhouette.  Use ctrl v to replace the offset section of the sentiment and delete the sketch pen sentiment and snowflake background.  Replace your sketch pen with your blade and cut out the sentiment.  I used a trimmer to cut my card to 6 ins deep and then scored it at 6 ins to fold into my card. Keep the remaining piece of card to use to cut out a white snow globe. 

Step Two - Snow Globe

  • From the snow globe card you need to delete everything but the two pieces outlined in red.

  • Use the scale menu and increase the snow globe and the window to 115%

  • Copy and past the snow globe onto an A4 page.
  • Select the original snow globe and on the Modify menu choose 'Release' this will release the centre part of the snow globe, which you can now remove.  Cut this solid shape from white card.
  • Open your 'Christmas Town Snow Scene' ,  ungroup and remove all the snow flakes.  Regroup and resize to 2 ins high. 
  • Change the fill colour of the window shape no fill and move it over the 'Christmas Town Snow Scene' until you are satisfied with what is inside the shape. 

  • Ungroup the town once more and making sure it is behind the window shape, select the outline of the village and the circle shape and under the Modify window choose 'Crop' this will remove the parts of the village that are outside the window shape and give you a perfectly sized village to put into your snow globe.  Group all the parts together and put it onto the page with the snow globe you are going to cut from black card and cut.


  • Finally cut the window shape from acetate. 

Step Three - Assembling your card

  • Glue the black village onto the white snow globe shape,
  • Glue the acetate window to the back of the black snow globe shape.
  • Put narrow pieces of foam tape all around the edge of the window shape, making sure it doesn't show through the acetate.
  • Put a couple of foam pads on the base base of the Snow globe.
  • Pour a teaspoon of beads onto the centre of your village, ensuring they are not near where the foam pads will adhere.
  • add the black snow globe to the white one, pressing down all around the area with foam pads.
  • Add a piece of baker's twine and your sentiment to finish the card.
I hope you enjoy giving this card as much as I have enjoyed making it.


DESIGNS USED:


PRODUCTS USED: