Thursday, 23 August 2018

Zoom to the Moon - a Glow in the Dark Card


Hello, Janet here with a fun children's greetings card using Silhouette Printable Glow in the Dark Sticker Sheets. This project shows how to use scraps and left over pieces of the sticker paper in an economical yet really effective way.

Silhouette Glow in the Dark Sheets used to make a fun space box card. By Janet Packer, Crafting Quine for GraphtecGB Silhouette UK


Box cards are always fun to receive and the Space Rockets Planet 3D Box Card by Snapdragon Snippets (#135755) makes a great birthday card for space-crazy kids. It has added 'wow' factor when the lights are dimmed, and the rocket, stars, planets, and text all glow in the dark.

The file designer has comprehensive instructions on how to put the card together. They are accessible from the file's description in the Silhouette Design Store here. In this post I'll concentrate on how to use the glow in the dark media to enhance the card.

Silhouette Glow in the Dark Sheets used to make a fun space box card. By Janet Packer, Crafting Quine for GraphtecGB Silhouette UK


Materials Required

Glow in the Dark Embellishments

I cut the background of the embellishment parts out of a scrap piece of the glow sheet (only 12cm x 15cm). It was surprising just how much could fit on the scrap when the Nest feature was used  (more info about that in my post next week). In addition, I added an offset for the word 'Zoom!' and a load of extra stars (at that point I had no idea if I would use them or not). The weeding hook in the pic is  to show the size of the scrap. The background waste just pulled off leaving the adhesive stickers behind.

Silhouette Glow in the Dark Sheets used to make a fun space box card. By Janet Packer, Crafting Quine for GraphtecGB Silhouette UK


I purposefully used the default cut setting, although it was a little high, so it would score the backing a little. This allows the backing to stay on selected pieces, those that would either hang off the edge, or be self supporting (the planet with the ring, and it's ring). It was simply a matter of pushing those pieces through to the back and trimming off any rough edges (much easier than aligning them with card or paper).

Instead of using paper to add the decorative parts, I used red metallic vinyl (it is SO shiny in real life) together with scraps of blue, green and yellow adhesive vinyl.

Silhouette Glow in the Dark Sheets used to make a fun space box card. By Janet Packer, Crafting Quine for GraphtecGB Silhouette UK


Making a Glowing Liner

Putting the glow in the dark material behind the 'twinkle holes' in the overlays adds to the overall glowing effect. Instead of using large pieces to make liners for the overlays, I used tiny scraps, just making sure that the joints didn't show through the holes. Before adhering them to the flaps I attached them in a couple of places with regular tape.

Silhouette Glow in the Dark Sheets used to make a fun space box card. By Janet Packer, Crafting Quine for GraphtecGB Silhouette UK


Here the liners are attached and the joins are invisible.

Silhouette Glow in the Dark Sheets used to make a fun space box card. By Janet Packer, Crafting Quine for GraphtecGB Silhouette UK


Finishing the Card

You might have noticed that I changed out some of the smaller pieces for some better colour contrast.  Do you revise as you go along?


Bye for now,


  Crafting Quine BlogInstagram @CraftingQuine


DESIGNS USED:

PRODUCTS USED:

Wednesday, 22 August 2018

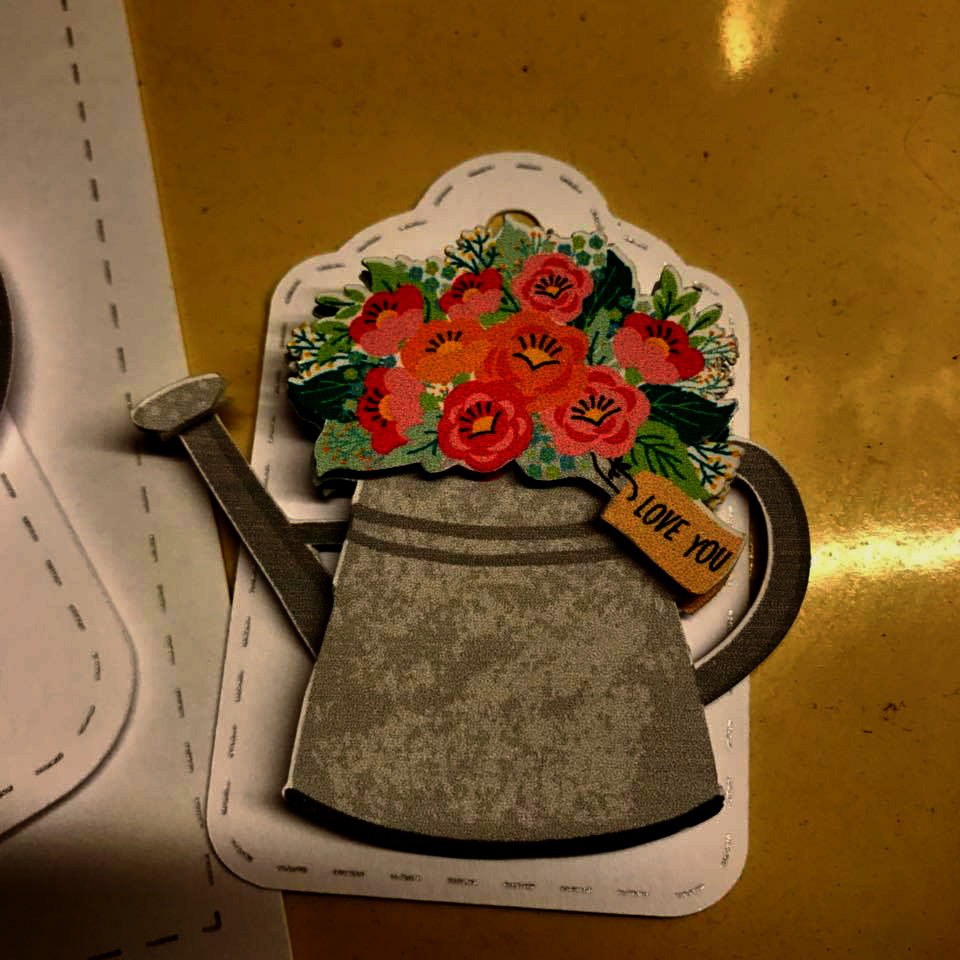
Design Of The Week - Watering Can With Flowers - 21st August 2018


Hello, hello - I have another free design of the week to show you.  This week's design is a print and cut design called Watering Can With Flowers.

I was a little unsure what to do with it and then I remembered that it is Mum's birthday in September and thought that like all good girl guides I should 'be prepared'.  So how was I going to use this design in a way that was a little different?


I am not a fan of decoupage but thought that this design would lend itself really well to this technique.  Rather than fuss about separating all the elements and printing them out I decided that I would print and cut them as whole pieces and then use scissors to cut away the bits I didn't want.


I decided I would make a co-ordinating tag to go with my card so printed out the design three times large and three times smaller.


Once I had cut these out I snipped the handle and spout from one and layered this onto another and then snipped the tag and flowers from the third and layered onto the first two.


I then cut two tag shapes, added faux sketch pen stitching and then used foam pads to adhere the watering can to the to which resulted in a lovely little card with a matching gift tag.


Monday, 20 August 2018

I love you more than all the stars - A card that keeps its meaning even in the dark!


Hi everyone. It's Verity here from Pretty Little Button bringing you another project. Today's project features the printable glow in the dark sticker paper. However, for this project, I didn't print onto the paper, but just instead directly cut out the design to stick on to my card. It is quite an easy project, so great to whip up in a tight spot!

I love you more than all the stars card detail: 


To start, find and download your design from the design store and locate this in your library. For this card, I used this 'I love you more than all the stars quote' by Sarah Hurley. Add the design to your design space and resize to the desired size of your card. I created an A6 (UK sizing) card. 

In order to make sure it would fit my card panel, I drew a rectangle that matched the measurement of my card panel. I changed the line colour to purple which will make it easier when cutting later.


Having made the design smaller, some of the smaller stars were very small and I felt would be too small to cut adequately and wouldn't be easy enough to transfer from the backing sheet to my card. Therefore, I ungrouped the design and removed the smallest stars. In addition, I copied and pasted a variety of different sizes of the stars to fill out the card more. 

When I was ready to cut this, I cut by line colour and only cut the red line - not the purple line which was the rectangle box showing the size of my card panel.


Once cut, I used the Silhouette Spatula to help lift the cut out stickers of the backing sheet and onto my card panel.

I created the background card panel using my watercolours. I made sure that I added a generous amount of clear water to a piece of watercolour card. I then dropped in a variety of blues and, greys and black colours into the water allowing to blend. I also added small amounts of purple, yellow and orange colours to help give that 'galaxy' look. This was dried with a heat gun, and I repeated several times until I was happy with the look. Don't worry, it will look a mess when you are making it, but it will look great in the end!

I love you more than all the stars card photos:


I have to admit, I was really impressed by the look of this card when I went into a dark room, it shines so brightly. I took this picture on a tile surface, and the stickers are that bright that they are starting to create a reflection


If this has inspired you to try this out, please post below. I would love to see it!

Until next time,

Verity


Profile Pretty Little Button Blog | Instagram | Facebook

DESIGNS USED:

I love you more than all the stars quote by Sarah Hurley - Design ID #244651

PRODUCTS USED:


Sunday, 19 August 2018

Sunday's with Steph - Lace style "Good Luck" card with WRMK wire work


Hello and welcome to my blog post!

I'm back from my lovely holiday now and time to start thinking about next years I think but first my blog post :)

So friends of ours have just opened up a beautiful café in Surrey and we are off there for lunch on Monday so I thought I'd make them a little card to wish them well on their new venture.

I found a lace card cutfile in the store: https://www.silhouettedesignstore.com/view-shape/195313 which I thought would look nice!  I widened the design slightly as I wanted to use some wire writing over the top as an added dimension and I sent it to cut on Bazzill card stock (cardstock, textured heave 80grams with two passes) and after a few minutes out my design popped!


I found some mixed turquoise paper to back the design and went to work on the wire (which I felt I had to use as I had impulse bought it whilst lounging by the pool last week - along with another dozen or so different wire colours - so expect to see some wire work over the next couple of weeks so my purchase is totally justified!!) The wire work went ok, not perfect but I've got lots of extra to practice with!!


Thank you for reading my blog post this week!

Take care,

Steph xx


Saturday, 18 August 2018

Design sewing Patterns in Silhouette Studio - A Sun Glasses Case


Hello, Janet here with a little tutorial on how to design a sewing pattern to make this cute holder for your sunglasses (or regular reading glasses), and some information generally on using the Silhouette Studio software to make your own sewing templates. The decorative fabric used for this project was printed from the Studio software. Instructions to do that can be found here.

I regularly use the Silhouette Studio software to design all kinds of projects; from card layouts, picture placements, to sewing patterns and templates. It makes drawing to scale very simple, and I no longer need to resort to graph paper and pencil for designs of all types.

This glasses case is based on a circle with a cut away to one side. It is lined with a complementary fabric and padded with wadding adhered to both pieces. The pieces are sewn together with a sewing machine and then it is folded over like a taco (or a pasty) and hand-stitched along one side.


Here are the steps required to make the pattern for the sun glasses holder.

1. If your pattern pieces will be restricted by the size of your fabric (mine had to fit on a piece of Silhouette Printable Cotton Fabric), set your Page settings to reflect that size (Page Setup panel, Page Size tab, set as required using 12"x12" if there are no relevant size restrictions).

2. Using the Drawing Tools, draw a circle of the required size (mine just fitted the width of the letter-sized paper). Select the Ellipse shape and hold down the shift key to draw a circle. Draw a second circle for the cutaway. If your glasses are deeper than those shown in the picture, you'll need to make this circle larger. Overlap the circles as shown, with the left-hand edge of the smaller circle aligned to the centre top of the larger circle, and with a small overlap. Next time around I'd make this second circle larger and the overlap shallower, but you'll need to experiment to find a good fit for your sunglasses.


3. Now subtract the smaller shape from the larger one. To do this first ensure that the smaller circle is in front of the larger one (select it, right mouse click, select Bring to Front).  Then, select both circles, open the Modify panel and select Subtract.
NOTE: 'Subtract' will remove all the overlapping parts of images that are in front of other images. Only the image that is located at the back remains. 


4. Add marks to show where to leave the opening (for turning the pieces from the reverse once sewn together). Use the Freehand Drawing Tool and ensure that the two marks overlap into the interior of the circle. If you are going to print them with your printer, select them both and increase the thickness in the Line Style panel, or they will not print out. As you'll see in the next step, I chose to use a sketch pen instead, so increasing the thickness was unnecessary for me.

5. If you are going to cut your pattern from a different size of paper, now is the time to change it. I changed to 12"x12" and moved the pattern towards the centre. Ensuring that the shape and lines have different line colours, select cut by line and draw the black lines with a sketch pen, and cut the pattern piece (red line) with the regular AutoBlade on a copy paper setting.


6. Once the pattern is cutout, it can be used to cut out the plain, patterned and wadding fabrics. The marks can be transferred onto the plain fabric.


7. Attach one piece of wadding onto the fabrics and machine sew them together with right sides facing, leaving a gap between the marks. Then turn the whole thing right side out and hand stitch down one side. You'll full sewing instructions on my Crafting Quine blog here.


Bye for now,

  Crafting Quine BlogInstagram @CraftingQuine


DESIGNS USED:


PRODUCTS USED: