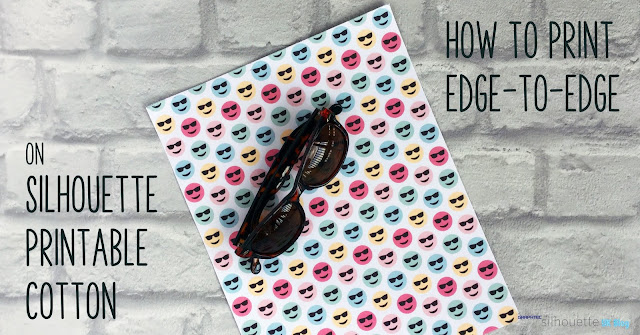
Hello, Janet here with a quick tutorial for printing edge-to-edge on the Silhouette Printable Cotton Fabric. The Silhouette fabric is a smooth cotton with stabiliser, and a paper backing. It comes in a pack of eight Letter-sized sheets and is perfect for Print & Cut projects as it has an inkjet printable surface. However, for my little sewing project I wanted the largest possible printed area, so printed a pattern edge-to-edge onto the sheet. Using a simple paper pattern, designed in the Silhouette Studio software, I cut the pattern and printed out the fabric.
This was a great opportunity to use one of the printable patterns that I'd bought from the Silhouette Design Store in one of their recent sales. This colourful design with sun-glassed, smiley faces by Renee Jablow (#206783, Color Emoji Pattern) was perfect.
In this post I show how to print on the fabric edge-to-edge. There will be a separate post on how to design the pattern for the sunglasses case in the Silhouette Studio Software, and instructions for the sewing part can be found on my Crafting Quine Blog.
STEP 1: Edge-to-Edge Page Setup
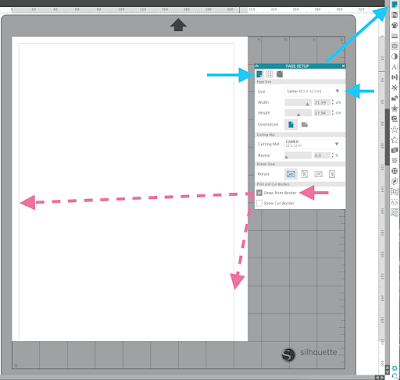
Set up the page in the Silhouette software for Letter-sized media, and turn on the grey print border (Page Setup panel, Page Size tab, adjust Size, tick 'Show Print Border').
The grey border indicates that any printing will only extend to that line. The print area is extended using the Printer Print Setup.
STEP 2: Edge-to-Edge Print Setup
NOTE: This is only possible if your printer has borderless printing capability; not all printers have it.
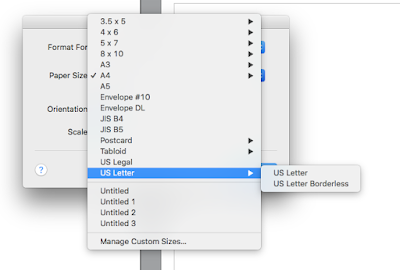
From the top menu access the Print Page Setup.
Select your printer and then the correct media size, i.e. US Letter, and Borderless. You may not have the same options, as what appears here is based on the options available from the printer selected.
The grey line on the virtual mat should now align with the outline of the page.
STEP 3: Fill the Page with a Pattern
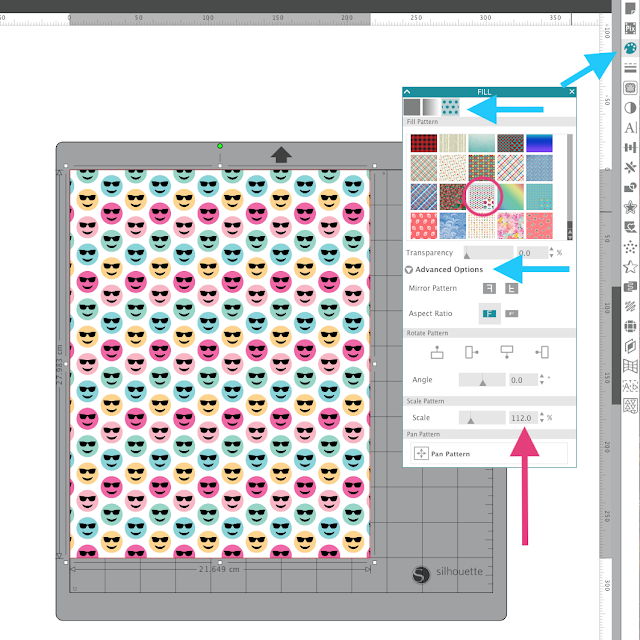
Draw a rectangle the exact size of the page using the rectangle shape from the drawing tools. Fill it with any pattern that has previously been installed in your Silhouette software (select the rectangle, Fill panel, Fill Pattern tab, scroll through and select a pattern). Adjust the scale of the pattern by expanding the display to include Advanced Options. For this pattern I increased the percentage to 112.
STEP 4: Printing the Fabric
Select File and Print, increasing the print quality if the option is available.
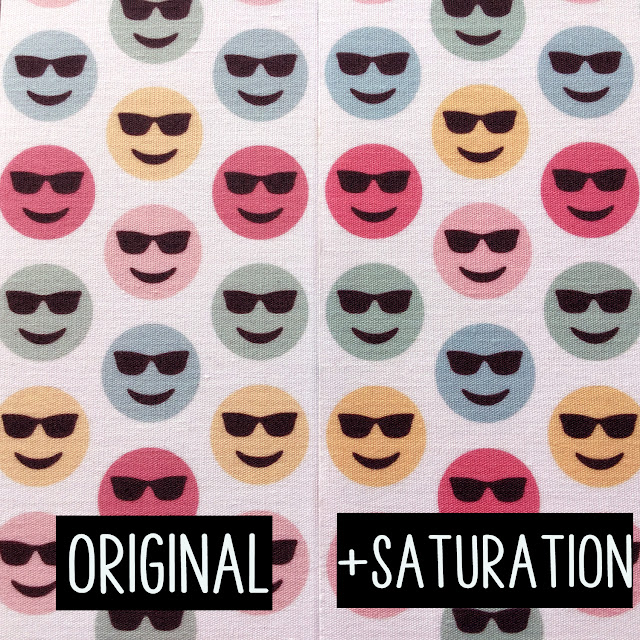
Note: When printed, the colours can be a little subdued. If you find this to be the case just increase the saturation of the colours of the fill prior to printing (open Image Effects panel, select Contrast, Brightness & Saturation tab, increase the value on the Saturation slider). I increased my value to 26.
This picture shows the difference - the left had one was printed without the adjustment, and the one on the right was printed with the saturation increased to 26.
Once your fabric is printed, it cuts beautifully with the backing on (you can draw on the backing too). The backing easily peels off and the fabric is then ready for sewing. The reverse of the fabric still has a stabilised backing which allows the fabric to be ironed on to other media (other fabric or even paper and cardstock). The strength of this bond is perfect to use in place of tacking, but doesn't form a permanent, washable bond.
The post on how to design the pattern for the sunglasses case in the Silhouette Studio Software is here.
I hope that you have found this tutorial useful - of course, edge-to-edge printing can be used on other printable media, as well as paper and card, so do try it out.
Bye for now,
DESIGNS USED:

|
PRODUCTS USED:

|

|

|

|






Would you be able to use this process for appliqué work? I am presuming it is not washable?
ReplyDeleteI've been wondering about that. Probably better used for items that wouldn't be washed regularly.
DeleteGreat idea and result Janet, thank you
ReplyDeleteFaith