Friday, 22 February 2019

Stash busting with my Silhouette February addition

Welcome to my second instalment of stash busting with my Silhouette!

This month I decided to use large cutfiles from the Silhouette Design Store to use up more paper and fill my page, adding interest to my scrapbook pages.

I was still feeling the love post Valentine's Day and chose 2 heart designs. Firstly the cut and fold hearts heart by Paige Evans 


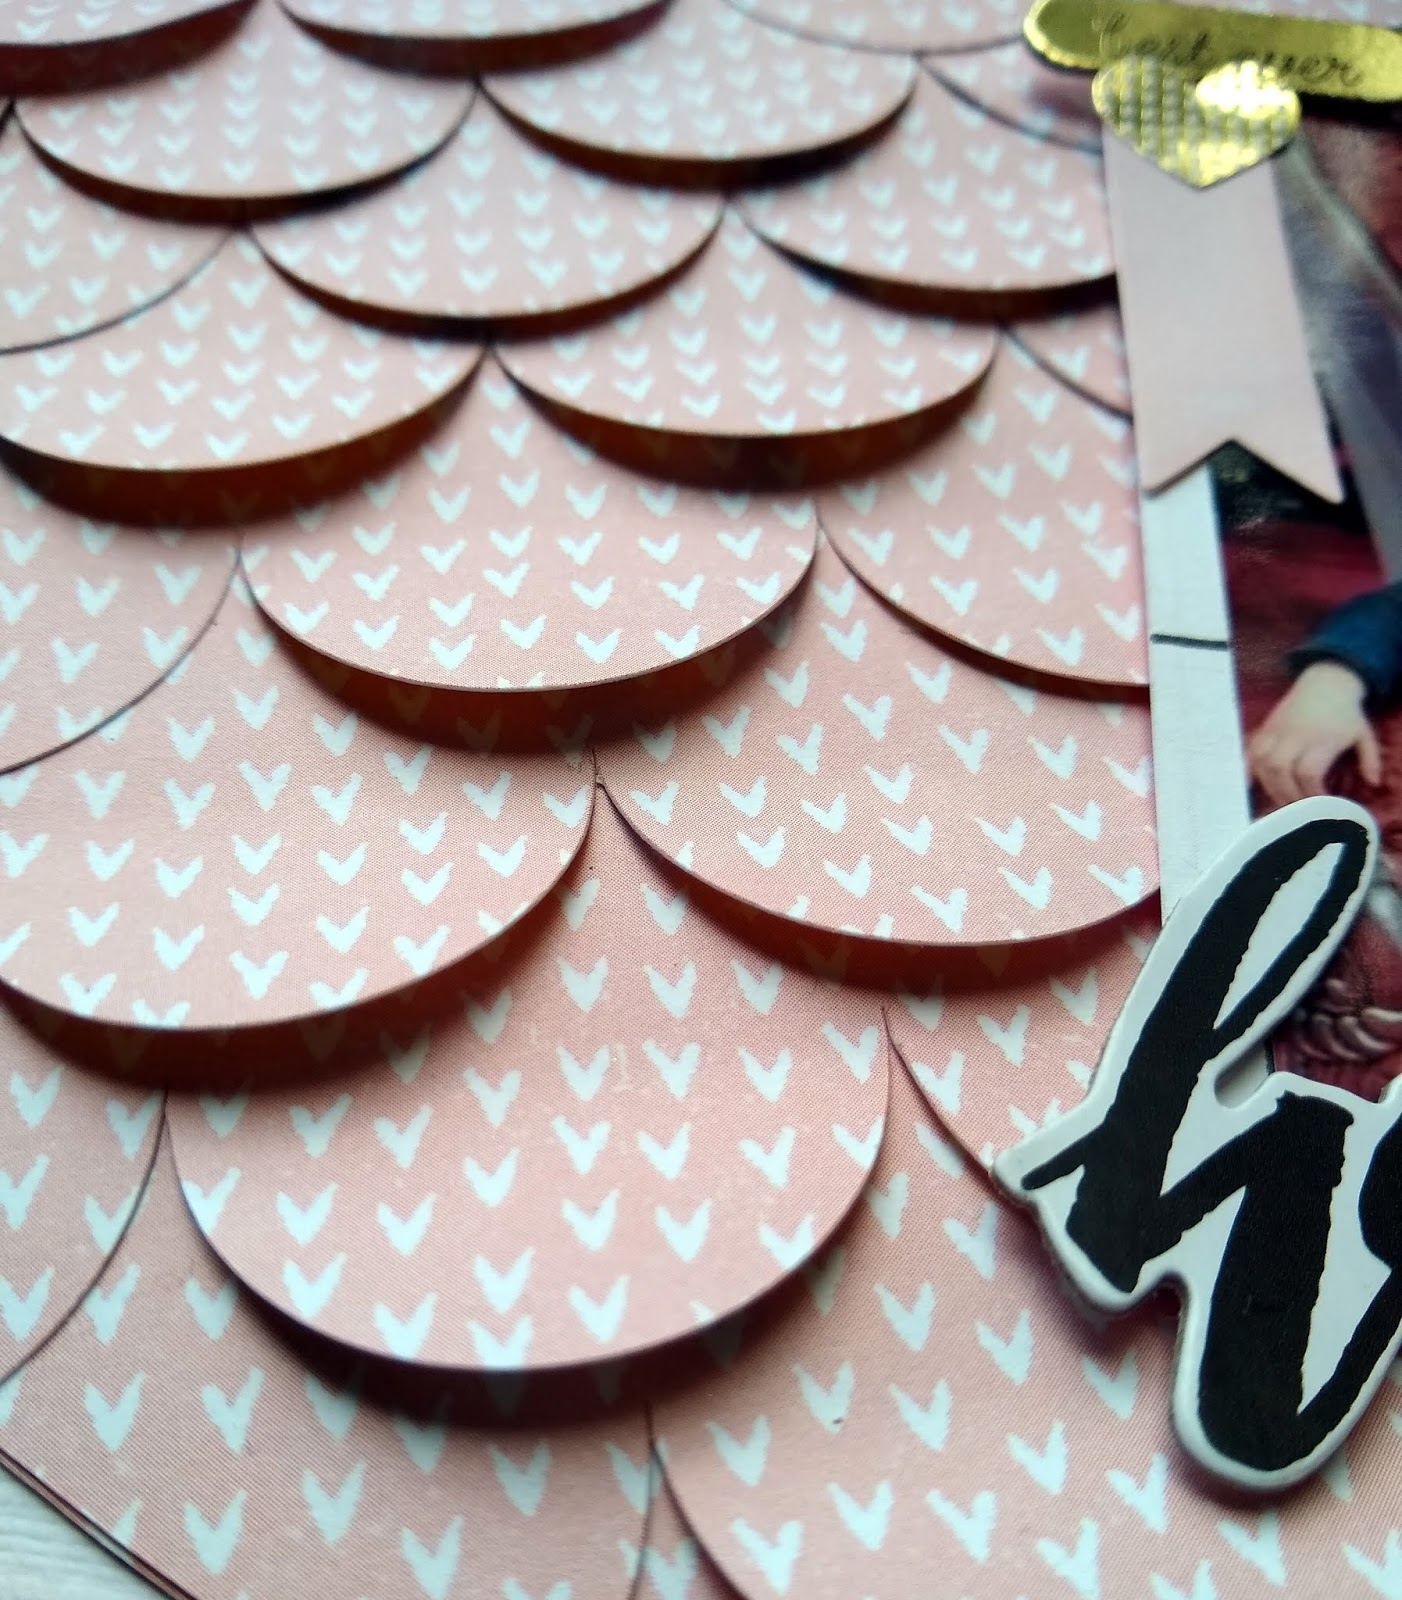
and the fringed scallop heart
I cut the fold and cut hearts out from double sided patterned paper, backing it with a co-ordinating design...


I used several different papers to layer under my photo 


A few chipboard hearts scattered around the photo, tags, a title and a journalling block and my layout was complete...


The fringed scallop heart has a base then 16 pieces that make up the scallops. I used some plain cardstock for the base and 2 sheets of matching patterned paper for the rest.

I painted a pale pink border where the heart was going to be stuck down and added a gold edge. flicking some gold mist around the page


It was simple to layer up the pink patterned paper pieces and I fluffed up the edges to give more dimension


2 photos were added with some extra paper behind, a title and some journalling


I loved how much texture these two cut files gave to my scrapbooking and I definitely managed to use up quite a bit of patterned paper as well so very happy!

Please come visit the blog again soon, I will be back next Friday trying out a new (to me) product and hopefully making something to help my weight loss journey

Happy creating

love

Ruth xxx

Wednesday, 20 February 2019

Design of the Week - You're A Lovely Human - 19th February 2019 - Doming Kit


This week's design is a phrase 'You're A Lovely Human' - useful for both scrapbook pages or cards.

I didn't want to use it as a title for my page so decided to pull out the Silhouette Doming Kit that I was fortunate enough to have been sent to try out.


I will say that this is not a quick process as it takes 12 hours for the resin to cure so not an option if you want to make something in a hurry. 


Inside the kit are the two solutions that you mix together to make the epoxy (A & B) a mixing syringe three nozzles, cocktail sticks and a download card with 10 designs.

Also three sheets of clear and three sheets of white sticker sheets with three laminating sheets for the white sticker sheets.


There are very comprehensive instructions on using the kit here

For my project I decided to use a photo of my daughter in scrubs and build the embelishments around it.

I chose several designs from the Silhouette Design Store which would be in keeping with my theme.  After resizing them I printed them onto a clear sticker sheet and then domed them.  I made my designs various sizes from large, for my title, to small for the heart, to see how well the kit worked on large and small stickers.


Unfortunately, I was too impatient and dabbed my finger onto the title and heart to see if they had set and ended up smudging them - be warned the old adage 'Patience is a virtue' does apply here. 


I used a stethoscope and heartbeat pattern, with a sketch pen for a border on my page and finished off with a heart/Stethoscope/doctor cut shape.


DESIGNS USED:

  
PRODUCTS USED:


Monday, 18 February 2019

Silhouette UK Design Team Call 2019


The Silhouette UK blog has been running for almost 3 years now, we have learnt lots together and are ready to dive in for another 12 months of amazing projects and tutorials – why don’t you join us?

We are looking for around 10 people to make up the team, the bigger the range of experience between them the better, so if your style is a little quirky don’t let that put you off applying!

We are looking for people with different machines from within the Silhouette range and that enjoy a challenge with different products. Machines include Mint, Alta, Cameo, Curio and Portrait.
You will be expected to edit your own step by step and project photos and write a blog post in the blogger interface for each blog project, in keeping it with a certain style.  We are also looking for people who enjoy making video tutorials, so if blogging is not your thing don’t be put off, we can turn your video tutorials into a blog post.

Do you want a great welcome pack, free Silhouette products delivered to your door each month, discounted products from Graphtec and to be the first to see new products and have free designs from the silhouette store?
  
Does this sound too good to be true? Well, it’s not! When you’re a member of the Silhouette UK Design Team 2019-20, you get all of this and more.

We’re looking for reliable, well-written, and enthusiastic bloggers, YouTubers and Crafters to join our design team. Are you up for the challenge?

What would you do as a member of the Silhouette UK Design Team?
  • Use your Silhouette machine to create and submit 3-4 new project tutorials monthly
  • Showcase Silhouette products and create detailed tutorials on how to use them
  • Optional opportunities may arise to take part in magazine articles, exhibitions, shows and demonstrations  
  • Be the go-to for new Silhouette users and provide inspiration for our Silhouette regulars
  • Promote your post via personal social media accounts and blogs
  • Contribute to the Silhouette UK Blog
  • Use your Silhouette Machine to make samples for TV shows and exhibitions

What does it take to be a member of the Silhouette UK Design Team?
  • Solid camera skills to show off your projects
  • Good knowledge of the machines functions and software
  • Computer skills – using blogger, dropbox, excel, and facebook
  • 2-3 hours a week writing project tutorials
  • A passion for the Silhouette brand and products
  • A commitment for 12 months (March 2018 to March 2019)
  • Good communication skills, you will work closely with the other team members to ensure projects do not overlap
  • Ability to work to deadlines and manage your workload

What are those perks you were talking about?

  • A Welcome pack to get you started
  • A special package sent to your door each month with supplies to use on your projects
  • Discounted products from the Graphtec store
  • Shout outs on our social media platforms (like Instagram, facebook and twitter) to your blog posts and designs
  • A link to your personal website or blog in every post
  • Free designs from the silhouette store
  • Be the first to find out about all things Silhouette 
HOW TO APPLY
Submit the following information in an email to lisab@graphtecgb.co.uk with ‘DESIGN TEAM 19’ in the subject line.

Name

Address

Email address

In a short paragraph tell us a little bit about yourself and your crafting history including:
  • Links to your website/blog and other social media sites, ie. Facebook, Instagram, Twitter, Youtube, Pinterest, G+:
  • If you are currently on a design team, please list them
  • Tell us why you think you’d be a good fit for our team
  • How would you describe your crafting style
  • What Machines you have from the Silhouette range – we are looking for Mint and Curio users as well as Cameo users
List which of the following categories you are most interested in, you can choose more than one.
  • gifts
  • clothing / accessories / jewellery
  • quilting / sewing / fabric
  • home décor
  • hobbies
  • scrapbooking
  • cards & papercrafts
  • vinyl projects
  • altered art
Attach photos of 5 to 10 of your best Silhouette projects for each of the categories you listed and include a step by step tutorial for a Silhouette project too (word or PDF format preferred) so we can get a feel for your writing style

It is great to see projects in the flesh, if you would like to send projects please send them to:
Lisa Bird, Unit R, Britannia House, Commercial Road, Wolverhampton WV1 3QS

Please note, projects will not be able to be returned to you and the Design Team Call is open to UK residents only

DEADLINE: Monday 18th March, we hope to have made a decision by Friday 22nd March
We look forward to seeing your work. Best of luck

Glitter vinyl vellum card


Hello, it's Verity here from Pretty Little Button. So today I have a project featuring glitter vinyl. This was featured on the blog a few weeks ago by many of the team, but at the time I was doing a video on a Silkscreen starter kit and didn't want to interrupt it. This weeks theme is using the new Doming kit, which I wasn't sent as I was sent the silkscreen starter kit. So instead I thought I would bring you a project using the glitter vinyl instead. If you love to add glitter to your papercrafts but without the mess, then this is perfect for you. Not only that, you can create lovely papercrafts combined with vellum as you don't need to worry about any adhesive showing through.

Whatsmore, I am showing you how to trace a store design making it into a cut file and duplicating it to create an intricate design for this vellum gatefold card. You could easily change the colour of the glitter to any in the store, there is a wide variety and also change the card up for the occasion. These could also make beautiful invitations to a wedding.

Glitter vinyl vellum card process: 

For this card, I'm using the beautiful design by Sweet Elsie, which is a gorgeous design to print out. Instead, I traced the design, to cut-out the beautiful intricate flowers. To turn it into a cut file, select the trace window and draw a trace area around the whole design. 

The settings for the trace when selected worked perfectly for the design and I didn't need to tweak the settings all. However, you may find you would need to tweak the threshold percentage to improve the trace. When I was happy, I selected 'trace' and a red cut line trace was produced

As the design doesn't fill a square panel, I duplicated the cut file and the right clicked and flipper vertically and then flipped it again horizontally. 


To combine the two cut panels, overlay one panel with the other. With both panels selected, use the modify panel and intersect the two cut files. Now any sections where the shapes overlap will connect and remove lines to produce a continuous shape. 


After you have a pressed interest, all the shapes will appear to lose from one another. This is easily fixed, before clicking off the shapes, right click and select 'group'. The shapes are all connected again. 


As I planned to turn this into a gatefold card, I wanted to make sure a 0.125" border remains around the design, including down the middle. You could just divide the panel in to and separate this wave, but the proportions will change. Instead, add a rectangle measuring 0.25" wide and slightly small than the panel down the middle of the panel. 


With both the panel and rectangle selected, use the modify panel and subtract the rectangle from the design panel. 


Now when you cut the design panel in two, the border is built in and will not distort the proportions of the design - draw the knife tool down the middle of your panel (blue line) to separate the two sides. 


Before you separate your two sides, make sure you group all the design elements of one side together before you move it to make sure your design remains intact.


To finish the side panels off, draw a vertical line down the side edge of the panel and with this selected as well as the design panel, right click and select 'make compound path'.


Lastly to ensure the designs cut with now breaks, right-click to edit points. You will find two red dots - these are end breaks and show the design is not one continuous cut. To remove this and make a continuous cut, double click the red dot. This will join the two end lines which are next to each other to join together. 


All being well, you will now have two side panels to send to your machine and cut out of glitter vinyl. I didn't have glitter vinyl as an option in my drop down material list. Instead, I used metallic vinyl and test cut to ensure I got the settings right for my machine and blade.

Glitter vinyl vellum card photos:

To assemble the card, peel the vinyl design off the backing sheet an adhere down onto a piece of vellum. Trim the vellum down with no border around the edge, except leaving a 1/2" flap along the outside vertical edge. 

Cut a piece of white paper to the same size as your vellum piece and adhere to the backside of the 1/2 flap on the vellum piece. Next, score along the vertical flap and fold to reinforce this fold. Appl some double sided tape to the flap and adhere to a white square card panel (my card worked out at 625" square card).

Repeat the above process for the other side panel. Once both panels are adhered to the card base, adhere another white square card of the same size to the back to cover up your adhesive/flaps.


To finish, heat emboss a sentiment onto a 3/4" vellum strip. Wrap this around the card front, folding at the edges and adhering the strip together on the back. Do not adhere the strip down the card back, adhere the ends to one another. Depending on how long your band and card is, you may have to attach another vellum strip to create the band at the back. 


If this has inspired you to try this out, please post below. I would love to see it!

Until next time,

Verity


Profile Pretty Little Button Blog | Instagram | Facebook

DESIGNS USED:

2x2 flowers card by Sweet Elsie, Design ID#285035

PRODUCTS USED:
    

Sunday, 17 February 2019

Sunday's with Steph 12 x 12 Best friends mixed media scrapbooking layout


Hello and welcome to this weeks blog post!

So I am lucky enough to have not one but three best friends.  One of them I have been best friends with since I was four years old so I decided to scrapbook them.  The photo was from my husbands surprise 40th birthday party last year and I had been meaning to scrap it for a while.


The paper collection I used was from Pink Fresh Studio their Indigo Hills 2 range and the cutfile I used was this one https://www.silhouettedesignstore.com/designs/253438?search=best+friends&sortby=relevance&submitted_search=true available from the Silhouette store.


It was cut onto white textured paper and then used some shimmery paints in navy and heather to smooch colour onto the page.  Once that was dry I flicked the same colours onto the page along with some gold.


Once the page was dry I backed it with a sheet of paper that graduated from purple to navy and then stuck down all of the insides of the letters with some glossy accents.  I used quite a few frames to give the bottom right hand side some depth, then added my photo and then a slim gold frame on top of that.

I added another embellishment cluster to the top left hand side of my layout to pull it all together and then added some lovely heart puffy stickers to complete the layout.


Thank you so much for reading this weeks post.

Until next week!

Steph x x