Hello, it's Verity here from Pretty Little Button. Today's post features flocked HTV from Silhouette and using the weld feature to create text knockout from a shape. Don't these baby grows look cute? And the flocked HTV is lovely and soft for the baby to feel too.
Flocked HTV baby grows process:
To start I loaded the baby elephant design in my design space from the Silhouette store and re-sized to my desired end size for cutting out. Next I typed the word I wanted to add to the design, 'cute', changed the font to Clara by Lori Whitlock and changed the size so it fit within the elephant.
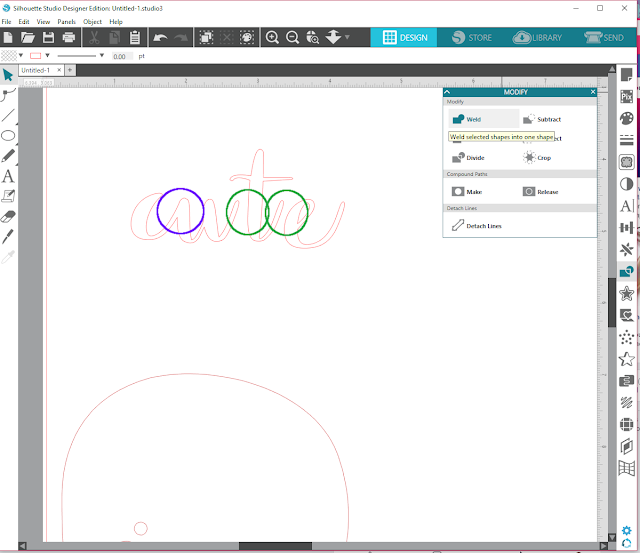
When you zoom in on the word as below, you can see that the letters are not connected. You can leave it like this if you prefer the word this way - the knockout design will work with disconnected letters. However, I wanted my letters to be joined up.


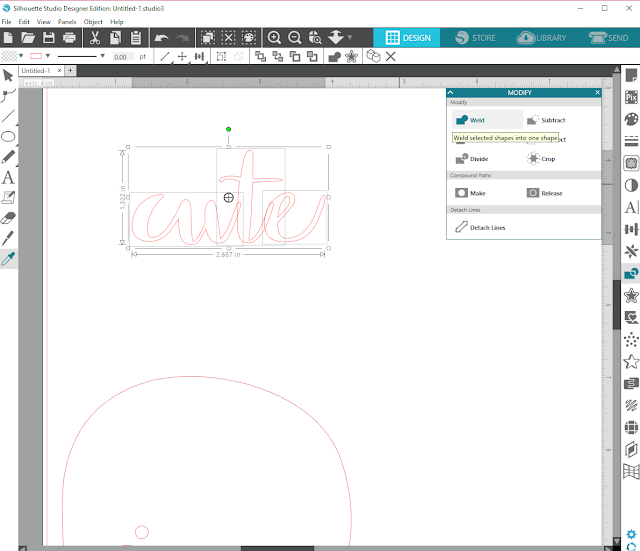
To over come this, you need to right click and un-group the word. All letters not joined will have their own box around them when clicked. Clicking each letter individually you can now move the letter with your keyboard arrow keys until the letters overlap.
In the modify panel select the weld option when you have all the letters highlighted. Any areas where you letters overlap, the lines will weld creating one continuous word outline.
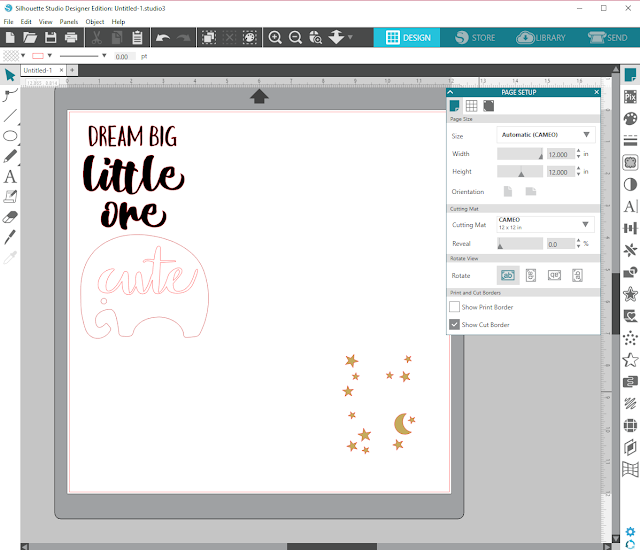
I planned to cut out two designs at the same time and to use two colours of flock. To do this, I positioned all the designs I wish to cut out of grey flock to one side and the design I wish to cut out from orange flock in another area on my mat in my design space.

To ensure I was cutting the designs where my flock was positioned on my cutting mat, I used the reveal option in the 'Page setup' window. This allows you to change how much the grid of the mat shows through in your design space. Doing this can allow you to determine where on the mat you should position your vinyl to cut from.
I sent the design to cut using the HTV flocked settings in the material drop down menu in the send window. Remember to always do a test cut, I found the settings I have left HT flocked on from previous cutting in the past still worked well for my current blade and didn't need to make any adjustments.
Now when you go to 'send' you design to cut with HTV you get asked whether you wish to send mirrored or send as-is. If I had cut at this point on either setting, my design would have been back to front or would not have cut out of my vinyl on the mat. Remember if you send as mirrored, it will flip you mat horizontally and the elephant would have cut out on the right hand side of my mat - where no vinyl is.
If you select send as-is the design would have cut out in the right areas, but it would be back to front. Not such a problem with shapes but the words would be back to front. If you plan to send as-is always have your design flipped horizontally before you enter your send window.
Flocked HTV baby grows photos:
To adhered my designs I used an iron to press the HTV onto the baby grows. I find it is best to iron these on a firm surface such as a table - I find my ironing board has to much give to allow me to get good pressure. I place a folded towel down on my table to protect.
Whilst applying heat and pressure with my iron, I place a piece of backing parchment over the top to reduced the chance or scorching the vinyl or fabric. Once pressed, I found it best to let the flocked HTV to cool before peeling.
After I have peeled the backing off, I cover once more with baking parchment and iron over the top again to get a good seal to ensure the vinyl will stay on well following washing etc.
If this has inspired you to try this out, please post below. I would love to see it!
Until next time,
Verity

Profile | Pretty Little Button Blog | Instagram | Facebook
DESIGNS USED:
Baby elephant by Pebbles in my Pocket, Design ID#11921Dream big little one by Lori Whitlock, Design ID#148172
FONTS USED:
Clara Font by Lori Whitlock, Design ID #226470PRODUCTS USED:


Both so adorable
ReplyDeleteFaith