Hello, It's Janet here from the Crafting Quine Blog with some glittery gorgeousness. February is heavy on birthdays in our household so I love to assemble a stock of tags and gift wrap pretties to use throughout the month and beyond. I've used the Silhouette Glitter Vinyl to add that extra bit of sparkle. The good news is that it works great on paper as well as on the more usual non-porous surfaces.
Happy Birthday Pop Ups
I've used the glitter vinyl to enhance a few of these fun happy birthday popups using the file by Sweet Afton (#73618) from the Silhouette Design Store. This file can be used as it is, or, as I've done, added letters in glitter on top. A contrast colour of cardstock would look effective too.
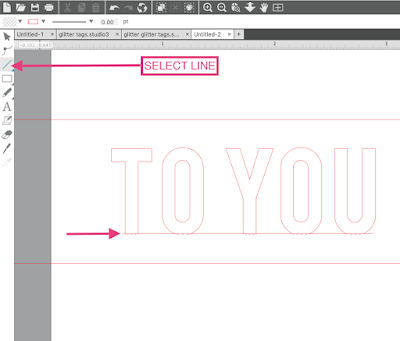
In the file, the letters aren't separate from the pop up strip. To separate them, it's necessary to ungroup the file elements. Then, taking one word at a time, click on the Line Tools, select the line, hold down Shift key on the keyboard, and draw a line across the letter bases just above the crease (dashed) lines. Reduce the size of the rectangle around the word, and group it with the word and new cut line, then arrange it with the other word groups. Then when you send this to cut the line will cut to separate the letters.
My version of the software doesn't list a cut setting for glitter vinyl (I really should update my software, but I've been holding out for the general release of v4.2 of the Silhouette Studio software - lots of amazing enhancements are rumoured). I used the setting for Metallic Vinyl, just reducing the force to 32 (see the screenshot below).
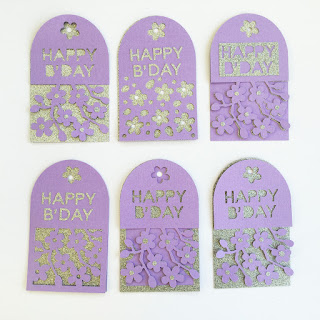
I've used the glitter vinyl to enhance some happy birthday gift tags. The file of pretty Cherry Blossom tags by Nic Squirrell (#79029) from the Silhouette Design Store has three variations. By layering, and alternating the positives and negatives of the pieces cut from lavender textured cardstock and the glitter vinyl, I made even more. I added "Happy B'day" using the CG Silent Night font by Carine Gardner (#236542). It isn't a stencil font as such, so the counters (the holes inside letters such as 'd') are not attached. It is possible to retain the counters and add them after, but I think this font works well without them. Instead of a greeting, it would be easy to add the name of the recipient instead for some truly personalised gift tags.
I kept all the negative pieces that were weeded from the designs. I stored mine on a scrap piece of backing paper (this one was left over from the Bird Sticker Designs that I made a couple of weeks ago, but the backing paper from the vinyl works great too).
I utilised the the negative of the letters to position the letters accurately. The thickness of this vinyl and the type of adhesive on this vinyl enables the negative to be peeled away from the cardstock without tearing or leaving a mark. That makes it easy to reposition elements too. Using suitably sized and centred cutting (weeding boxes) around the letters also means that the negative can be used as a design element in its own right (see the tag in the top right of the six tags photo earlier in the post).
I'm sold on the glitter vinyl. It very glittery, cuts beautifully and doesn't shed - perfect to use for special occasions of all types. I hope you'll try it.
Bye for now,
Crafting Quine Blog | @CraftingQuine
DESIGNS USED:
 |
 |
 |
PRODUCTS USED:
 |
 |
 |


VERY VERY impressive Janet. Love the idea and the glittery paper addition.
ReplyDeleteFaith
Thanks Faith. The silver is a vinyl, so self adhesive - no adhesive required.
Delete