
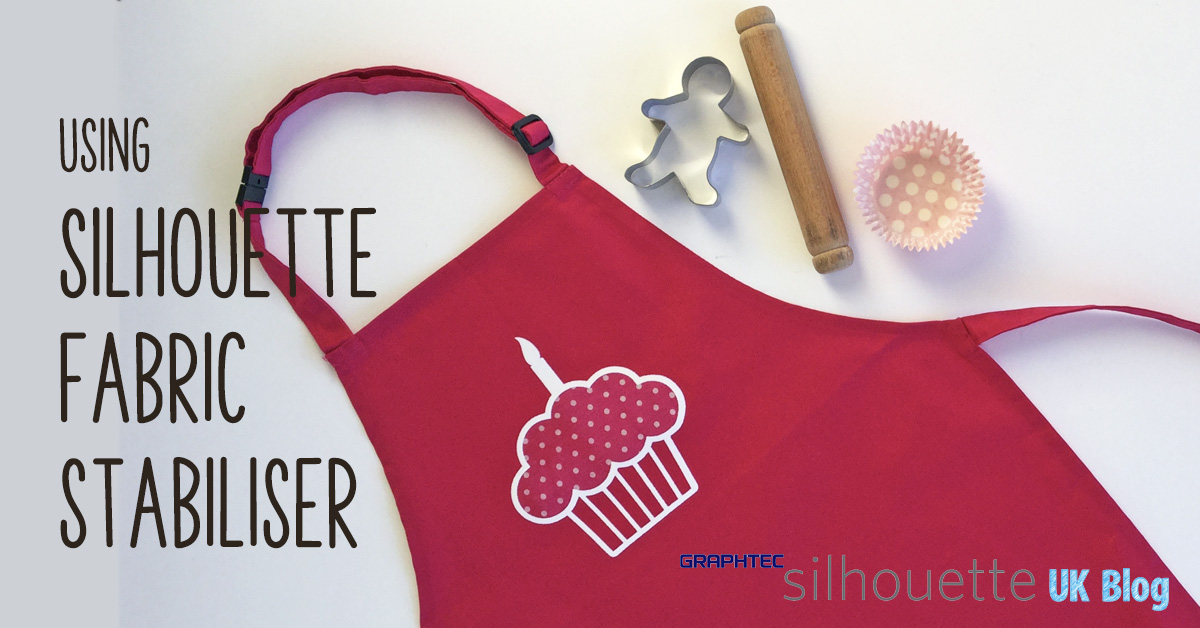
Hello, Janet from the Crafting Quine Blog here with a tutorial for applying fabric using Silhouette Fabric Stabilizer with a flocked heat transfer (HTV) edging. This is an easy way to jazz up a plain apron, and the same technique can be used for many other projects from t-shirts to cushions. I used a polka dot cotton fabric and the Silhouette Clean Cut Fabric stabilizer which eliminates the need for sewing. The cupcake design (#34751) is by Patty Young from the Silhouette Design Store.

Silhouette Fabric Stabilizer comes in three varities - Clean Cut, Cut & Sew, and Wash Away. The ideal version for this project is the Clean Cut one as it is fusible on both sides, firstly to the fabric and then to the garment.
What you’ll need:
Silhouette Cameo® or Portrait®
Silhouette Clean Cut Fusible Stablizer
Flocked Heat Transfer Material
Polka Dot Fabric
Plain Apron
Non-Stick Sheet or Pressing Cloth
Iron
(optional) Heat Press
STEP 1: Prepare the Design
Make an outline of the design to cut from flocked HTV, and and make a smaller frosting piece to cut from fabric with stabiliser fused to it. As there are quite a few steps to making the design into an outline, I have placed the instructions for making it at the end of this post.

STEP 2: Cut and Prepare the Heat Transfer Material
Place just the outline onto the virtual cutting mat and reverse the design (select, right mouse click, click Flip Horizontally).

If you are using a scrap of flocked heat transfer material, rather than a roll, position it onto the cutting mat with the shiny surface toward the mat in the equivalent position. Secure the media to the mat with washi, or painter's tape to keep it flat. Carry out a test cut if you haven't cut this media before. Send to Silhouette to cut using the HTV, Flocked cut settings as a starting point. I was able to reduce the force to 30.
Remove the media from the mat and weed (peel away) the waste pieces. The decal is now ready to apply.

STEP 3: Prepare the Fabric and Apron
The best finish is achieved by pre-washing and ironing your fabric first to ensure there is no shrinking or warping. Allow to dry then press to smooth out wrinkles. Cut a piece of stabiliser slightly larger than the design and press the rough side of the stabiliser to the reverse of the fabric firmly until it has just adhered. You can either leave the backing paper on, or peel it off (I've tried it with and without the backing, and both have worked out fine). Mount the fabric facing up on the Silhouette mat. Use a sticky mat and a sharp blade. Send the design piece to cut using the 'Fabric, Thin (cotton print)' cut setting. The Clean Cut stabiliser and fabric cut very cleanly and the stabiliser minimises fraying. Remove the cut design from the mat.

Remove the backing paper from the design if you have not already done so.

STEP 4: Applying the Fabric and Heat Transfer
Apply the fabric piece first using a medium hot iron with the steam function turned off, and protecting it with a cloth or non-stick sheet between the iron and the fabric.

Align the heat transfer decal and iron it on top of the fabric using the protective sheet between the iron and the decal. Press firmly on a hard base (I use a clean wooden chopping board) until the flock had adhered, and then carefully peel the clear protective layer away. Press again from both the front and the reverse of the apron, still protecting the design. The pressing at this stage may be done using a heat press.

The apron is now ready to wear.
Making the Design into an Outline
Open the design in the software. Separate the pattern pieces by ungrouping them (right mouse click, select Ungroup). To simplify the design delete the two tiny pieces (select, click back space on the keyboard).

The pieces don't have an outline, so it is necessary to make one. If you have a simple shape you can use the technique described in Nadine's post, No Sew Fabric Appliqué with HTV Edging. This shape has more pieces, so we need to use the offset tool. First make an external offset of the cup and frosting pieces (select, open Offset panel, select Offset, change Distance to 0.175- inches, click apply).

Select the outer frosting piece and make a further internal offset of 0.09-inches. This middle one will be one that is to be cut from fabric.

Make a copy of this one piece and move the copy aside (select, right mouse click, click Copy). I've made both of these pieces blue so that they can be seen more easily. Select both cup pieces and make them into a compound path (select, right mouse click, click Make Compound Path).

Reposition the blue frosting piece so that it overlaps the cup and the entire top outline is within the frosting.


It should then look like this. If it doesn't, click undo and work through the previous instructions again.


Move the candle and flame into position on the frosting with a slight overlap, select everything and weld them all together (select all, right mouse click, click weld).


Further personalisation of the apron is possible, using letters cut from the flocked heat transfer in the same way as the outline.
If you like the idea of personalising an apron, there is an older project which shows you how here.

Other Fabric Projects
If you haven't cut fabric with your Silhouette before, I urge you to try it.
Here are links to some of my favourite fabric projects. Just click on a pic to visit the page for that project.

|

|
 |
 |
 |
Bye for now,

Crafting Quine Blog | @CraftingQuine
DESIGNS USED:
 |
PRODUCTS USED:
 |
 |
No comments:
Post a Comment